Friday, 29 November 2013

My Modes4u Christmas Wishlist

Hi Everyone! (: This post is dedicated to modes4u.com !
They are having a giveaway which you can read about here!

These are the 5 things on my Christmas Wishlist from modes4u !

1. Soft Mold Alphabet And Numbers From Japan US$14.17
2. Re-Ment Rilakkuma Relaxing Meal Dolls Miniature US$9.09
3. Re-Ment Hello Kitty Birthday Party Miniature Blind Box US$7.40
4. Disney Re-Ment Alice & Mickey Showcase Miniature Box US$29.77
5. Rilakkuma Re-Ment Miniature Blind Box Birthday Cake US$7.40

Total US$67.83

I really hope that I could win this giveaway. If I do, I'd definitely be posting up my experience on making new crafts with these interesting DIY kits!

Anyways, for the rest of you, do head over to their giveaway post here and try your luck too! You may have more Christmas presents coming your way than you think ;) Cheers!

Tuesday, 26 November 2013

Fierce Avian

Avian means bird.
I've used the word in a few works of mine.
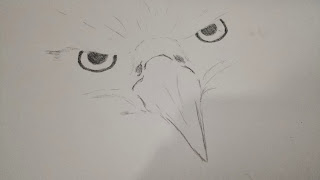
Here's one of my drawings from last month
I drew this first and asked people to guess what it was.
Someone said duck.. and yea.. I do think it looks a little like a duck.

But it's not. It's the gorgeous eagle! One of my favourite birds to draw. My other favourite is the pheonix! You can check out some of my other works here!

I got the middle part done first. This includes the beak and the eyes.
Then, I lightly drew how I want the feathers to look. The direction they face and the thickness around the neck area.
Then I darken the beak and the face features.
Then the area below the beak. I think it looks really nice like this.
I sort of did a little mistake by blending it too much. I quite like it's fierce look when the pencil markings aren't blended together too much.

The blending made the eagle look too friendly.
That's all. Thanks for dropping by!
Hope you enjoyed reading this!

Tata! Do also follow me on my instagram for more artsy fun!
Craftysupermom

Monday, 25 November 2013

Tribal Dolphin Drawing

Here's a drawing I did while waiting for my dad one day.
Unfortunately, I did not bring my beloved sketchbook and had to drawn on a book with lines.
Here goes :
My attempt at drawing a Tribal Dolphin. There were no pictures for examples. The drawing 'jumped' out of my brain onto the paper. I think I'm quite satisfied with the end result.
How do you like it so far? My favourite is the face and the tail.
This is the completed drawing.
I did several drawings like these before and am proud to say that there were people who said they'd like to get tattoos with my designs! A friend's mom also asked for me to create a customized 'unicorn carousel' design. Which, I did but didn't really finish up and sorta lost it. Opps! Oh well, I'd probably try that again one day.

Sunday, 24 November 2013

Tic Tac Toe Costume

Last costume for now of the month!
The Tic Tac Toe Costume! Who says you can't have fun after dressing up?
Here's what you need :
A Plain Board (for base)
4 Different Coloured Felt
Scissors
Random Round Object (Optional)
Velcro
Glue/Tape
 To make the base stiff, tape/glue a large piece of felt (We got ours from Daiso at Rm5) on a large plain board. You can reuse any old board you have at home.
Before sticking them down completely,

 You have to cut out a strip to hang over your neck to carry the board. Glue/Tape them in between the felt and the plain board. This will allow it to carry a heavier weight compared to only sticking it in front or behind the two pieces (board + felt piece).
When that is done, cut out long black strips of felt (or any other colour) to make the crisscross pattern as shown above. 
Next, you'll have to cut out the shapes X and O. You can plan how many you want and cut them out accordingly. Then, prepare some velcro to stick on four corners of the shape. This allows it to be played as a game. You can stick them in place right away.


And you're done! Wear any base clothing you want. You won't be able to really see it anyways.
That is all! Thank you for dropping by!

Do follow me on instagram for more artsy fun : Craftysupermom


Saturday, 23 November 2013

Flower Pot Costume Tutorial

 Hello there! We're making a flower pot costume today!


 Here's what you will need :
Perspex cutter / Blade
Hammer (To aid with cutting the pail)
Pail
Faux Flowers
Drill (optional)
Strings
Headband
Tape
Basic White Top (optional)

 
 The first thing you will be needing is the pail! You'll have to use the blade/perspex cutter to cut a circle in the base of the pail as shown above. You can also use a hammer to aid by hitting the blade/cutter into the pail for a start. This will make the flower pot.
 
 The next thing you will need are the flowers. Gently tape the flowers around the sides of the pail to make it seem like the flowers are growing out of the flower pot.
If you have extras, you can always use the headband twined together with the extra flowers to make a lovely flower crown. Trim the ends if it's too long.
When you're done, you can match it with a basic white top and you'll look like this!
You can also dress in other colours to make it more colourful. Flower pots can be filled with all sorts of flowers anyways!

We also have a video on Appetit's Youtube Channel!

Egglicious Costume

Who here love eggs?!
Who here loves them so much that you would want to be an egg! 
Well, with this tutorial, you CAN!
We'll be making an egg costume today!

What you will need :
White felt
Yellow felt
Velcro
Scissors
Sewing needle and thread

Place two pieces of white felt together, and draw an irregular circle. This would be the egg white!
Then cut it out (:
This was halfway through the video
*spot the salmon from my previous post behind!*
Next, place the yellow felt on top of the white cut out felt and decide how big you want your yolk to be. Draw a circle and cut it out. You can use any round object to guide you. I did it free hand. If you're good at that, go ahead. It's okay to be slightly off too.

Then, attach both white pieces with velcro on the side. Be sure that you don't place the velcro in the middle as you will be sandwiched in the middle of the egg costume.

And that's all! Have an egglicious day!
Tata!

To check out the video, head on over here!

Thursday, 14 November 2013

Walk In The Closet's Rebirth!

 Hi everyone! So, here's what I've been up to lately.
I've remodeled Walk In The Closet (A fashion site for affordable accessories! Clothing only to come in the future) and really love its new look! I think it looks more proper and friendly. It also has a very simple background but still seems interesting and neat.

Note : I would be really really REALLY really over the moon if you can do a little something for me..
1) Visit the site!
2) Register as a member!
3) Tell your friends about us! *extra brownie points for you!*

How to register? EASY!

 Go to "My Accounts" which you can see on the black bar, then Login, and you will find a Login and Register button on the right.

My Accounts -> Login -> Register
Only very basic information are required for registering.

When you are done, you can start browsing! Scroll over to Accessories to see all the categories available!
 Do take note that not all of the items are shown on the first page, you can click to view the next page on the bottom of the site. Click into the item you are interested to have a look at and you'll come to something like this :
 
 Meanwhile, we are also having some promotions on!
So, hurry up and check out those awesome stuff!
So yeah! That is it!
Postage are currently fixed on Poslaju as there were several problems we faced with registered post. No worries though, if you happen to order above Rm50 and am living in Malaysia, you get a free postage!

We already have a number of items up in our site, and will be posting more up soon in about a week's time! Reason being that they are all on a photo shoot holiday at the moment.

So yeah! That is all for this post! Thank you for dropping by.
Your support is greatly appreciated! You can also help us by liking our Facebook page, Instagram, and sharing us on your Facebook!

Other products that are available in Walk In The Closet.


What are you waiting for? Hurry up and go check out our site now!
We will be sending out a newsletter with a special voucher real soon! So, sign up and you'll most likely get extra freebies and vouchers!

Wednesday, 13 November 2013

Salmon Sashimi Costume

Hello beautiful people.
Today I'll be showing you how to make a superbly adorable costume!

Watch the video at Appetit!

What you need :
Orange Fabric
White Pillow
White Overalls or Long Sleeve Top
Marker
Black Fabric
Velcro
Fabric Glue
Scissors

 Get your fabric and your pillow. In this case I used an orange t-shirt for the fabric.
Gently place and adjust your orange fabric on top of the pillow wherby it covers the whole top surface. If it is slightly smaller than the pillow, it's fine as you will be having gaps in between the orange fabric later.


Get your markers (of similar colour if available).
Visualize how many parts you would like to separate your salmon sashimi into. I did it in 5 parts. (only 4 can be seen in the picture above)
Find the middle of each 'part' and leave a dot. Then dot both the sides of that section too (which will be connected with the section below and not of the same level, forming a partially triangular shape).
Next, you will need your black fabric. I used felt from Daiso.
Cut out a piece of black 'seaweed' with the estimated ratio of 1:3 of the pillow.
Make sure that it is longer for you will have to fit into it as well! Attach velcro at the end of the seaweed. If you'd prefer the costume to be free sized, attach longer velcro pieces so the size is adjustable.
When that is done, it's time to cut the salmon sashimi with the points you've marked and glue them down! Fabric glue would work great here!
When you're done with all your pieces, grab your white overalls or long sleeved tops and wrap yourself in 'seaweed' together with the salmon sashimi!
And there you have it! The salmon sashimi sushi costume!
It's THAT easy!

Let me know if you decided to try it out!

Also, you can follow me on instagram for more crafty goodness :
CraftySupermom

To view my handmade crafts on Facebook, do visit :
BoxOfHobbies