Wednesday 26 March 2014

Door Signage For A School-Themed Cafe !

We're talking about 'school' today. Here's a throwback picture of me from 2009!

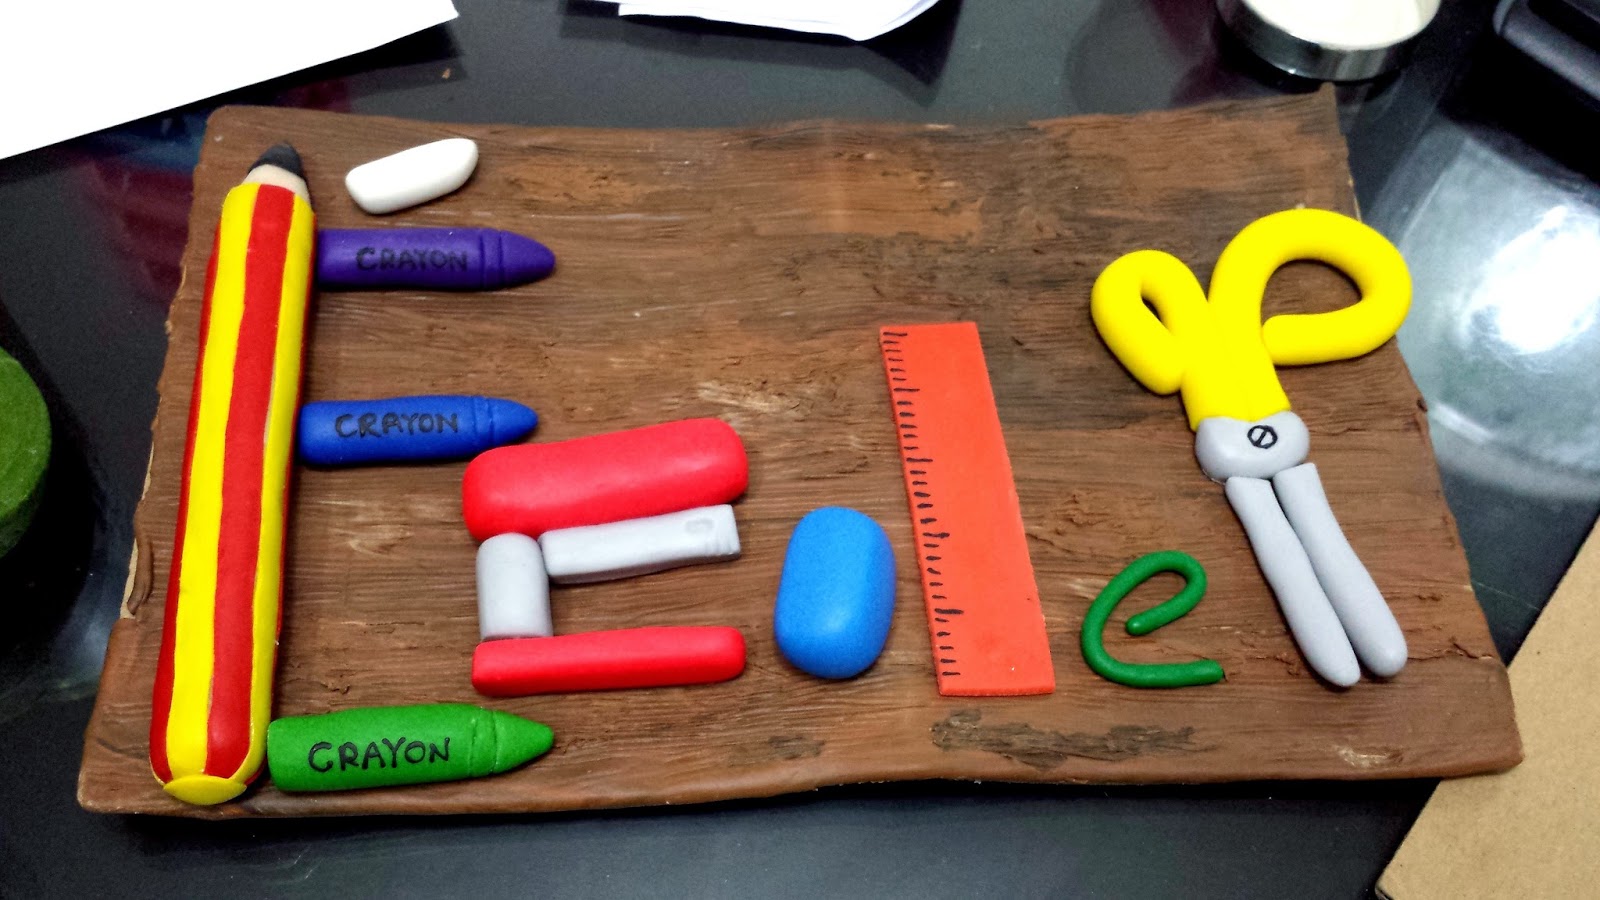
A couple of months back, there was a request to make a door signage for a new cafe! It's a school-themed cafe named Ecole P.
My customer is a friend of the cafe's owner and thought it'd be a lovely gift! Customized and more "schooly" than those made outside I suppose. I have never done a signage nor a school-themed project before, so it was pretty exciting to try it out!

For the base of the signage, I got a regular flat cardboard piece and covered it in different shades of brown clay. Then, I used a tool to scrape the unhardened clay to make it seem like it's made of wood.
 It looks like it's really made of wood doesn't it? I covered one side and left it to dry. Then, I moved on to the name of the cafe. I drew out how I'd like the words "Ecole P" to look with some school-themed items like pencils, erasers and so on.

There was an empty pen shell which I almost threw away that morning and decided to recycle it by wrapping beige clay around its body to make a clay pencil for the very first letter in 'Ecole P'. I wrapped quite a huge chunk of clay around the pen shell.
Folded in the excess where the pencil 'head' will be, and cut off the back end.
 Then I proceded to making the triangle part of the pencil head with the black lead tip.
 To cover the 'neckline', I did long strips of red and yellow pieces of clay for the pencil body and wrapped the whole thing piece by piece.
 I think it turned out really nice. I tried to add an eraser at the back end, but it looked a little funny so I removed it. To complete the E in "Ecole P", I made little crayons! I loved using crayons as a kid, but then learned to dislike it when I grew up and preferred to have clean hands. Whoops!
 Different colours for each piece. The excess clay was trimmed and I painted the word 'CRAYON' with black acrylic paint. Aren't they adorable?
 The "C" took me pretty long to figure what stationary I could use to resemble it. But I finally decided on making a stapler!
 (I won't go through every single item.)
What lined up next was an eraser, a ruler, a bent paperclip and a scissors with one side larger than the other to show the 'P'. The 'e' took me a while to figure what I could use too. Luckily, there was a few lying on my desk which sparked the idea.
 To hook the signage up, I braided 3 brown strings together to form a little rope. Superglue came in handy and the back of the signage was also covered it in clay.
 
 When it's all covered, it was scraped for that wooden effect once again.
This whole piece is to make the signage nicer as well as to hold the strings in place. I sure hope they don't fall off!
 The customer wanted something that writes 'Welcome To Ecole P' 
and so, I came up with this red piece just drapped on the top right of the signage. I think it fits in pretty well. I used white acrylic paint to add the word "Welcome to".
 (I actually forgot to take a photo of the completed signage with the red piece that says "Welcome to")
Opps. Oh well! I believe you can use your super magnificent brain power to imagine it there!
And so, that's it! The new mini door signage for Ecole P is done!

If you'd like to visit Ecole P, the details are at the bottom of this post!

Do also check out my :
1) Facebook "BoxOfHobbies"
2) Instagram @Craftysupermom


Ecole P
First Floor, 19, Jalan SS21/37, Damansara Utama, Petaling Jaya, Selangor
Open 11am-10pm, except Thursdays.
Tel: 03-7732-9711

Thursday 20 March 2014

Fabric Giveaway!

Woohooo! Modes4u.com is having another giveaway!!!
This time, you get to win 1 meter of each of the fabric shown above!
My favourite is the last one with the fox and hedgehogs! How about you?

Fabric lovers, all you have to do is go here for the details!
There are a few options whereby you can gain more chances of winning the giveaway! 
So, all the best!

Also, checkout Modes4u for more lovely fabrics!!

Tuesday 18 March 2014

Tutorial : Wedding Tux/Gown Keychain

Love is in the air. Here's a very simple tutorial on a Wedding Tux/Gown Keychain!
You can make it for yourselves, or as a lovely gift to a newly wed!

Find a suitable picture on the internet, your search keywords could be something like "2d wedding gown/tux or cartoon wedding gown/tux" or so. Print it out and cut the pieces out.

Then, roll a thin sheet of black and white clay (or any colour you desire your outfit to be)
Place the cut out paper on top and use your x acto knife or blade to cut the base out.
 Trim your picture so that the little details on top is a separated piece from its base (example : cuffs, tie, wedding dress ribbon, etc). Repeat the same thing as above : place the designs on top of your clay pieces and cut them out. Stick them on the base you created earlier on and you're done!

Coat it with varnish and leave to dry. If you wish, you can also add the newly wed's name on each keychain.
When it's dry, attach it to a keychain hoop and it's done!
Simple and beautiful isn't it?

If you love my tutorials, do :
1) Follow me on my blog
2) Follow me on Instagram : Craftysupermom
3) Check out our instagram hashtags #boxofhobbies & #supermomcollectibles

Have a wonderful day!


Monday 17 March 2014

Tutorial : Gandalf The Grey Clay Figurine

Lord Of The Rings . Hobbit . Lord Of The Rings . Hobbit

A couple of months back, I decided to make some clay figurines (Check out Olaf, Jack Sparrow, T.Pot too!) of known characters. This includes Gandalf The Grey, which I will share a tutorial of today.

What you will need :
1) Clay (Grey, Beige, White, Black, Brown)
2) Craft Tools (if available)
3) White Glue
Using any coloured clay or scrap clay, form a rectangle for his body. Then, roll out a large thin piece (rectangular shape or so, doesn't have to be perfect) of grey clay for Gandalf's clothing. Wrap it from the front to the back and cut off the extra that overlaps. As you push the thin grey clay down, little 'flaps' would form as shown above. Just gently press it down (you can use tools to help you) and smoothen the top. Attach Gandalf's arms. You can use wire if you need to. I usually do that to make sure it doesn't fall out of place.

The sleeves are a little tricky. Roll out another thin piece of clay, wrap it around your finger and use a scissors to snip off the ends to make the edge smooth. Your clay will most likely stick together where it is cut. Use your finger and push through the cut end. It shouldn't be too hard to open up. Stretch the ends gently on one side that the sleeves would look like one side is bigger than the other.
Slip it through the arms with the smaller ends facing Gandalf's body. Attach it with glue and press it down gently. Add Gandalf's brown belt by rolling a long thin piece and wrap it around the mid section. Mix grey with white to form a lighter shade of your choice for his scarf. It doesn't have to be perfect, wrinkle the ends and place it over the shoulder. Finally, make Gandalf's head and estimate the size.
 If the head is alright, pull it back out again to complete the scarf. Make another thin long grey strip. Randomly make folds and place it around the 'neck' area. Leave the middle spot to fit Gandalf's head.
 Roll out long strips of very light grey for Gandalf's hair. It doesn't have to be exactly the same length throughout. Then add his stash. Gandalf looks much better now that his hair is place huh?
To make his hat, repeat the steps for the sleeves, but pinch one end (the smaller side) together. Use scissors to modify the top of the hat that it may be pointed. I used a needle tool to make lines on Gandalf's hat as well (optional)
Make another thin piece and cut out a circle slightly bigger than the pointed part of the hat. Once again, it doesn't have to be perfect.

Let Gandalf wear his hat and add eyebrows! The same shade and colour as his hair/stash. You can use white glue to attach them.

Can you see how Gandalf has one hand reaching out for something? Well, he's missing his 'Staff Of Power' which acts as both his primary weapon and walking stick.
It wasn't too hard to make this. I merely rolled out 2 different shades of brown together, form a stick shape where the top is slightly fatter in size, cut the ends a little with a scissors, use a needle too to make wooden marks throughout, and finally adding extra 'wood veins' curling around it. I think Gandalf's staff looks pretty good.

I added a small black piece for Gandalf to stand on so he looks more like a collectible item. You can check out more of him and some others on Instagram with the hashtag #SupermomCollectibles
What do you think?
I can't decide on a photo. They all look too good. In fact, there will be a picture for every angle as you scroll down in a bit.
Can you spot some friends photobombing behind?
It seems like some carrot-nose-ball-of-snow is waving hello! And there's also a banana-lover right beside!

Like I said.. I can't decide on which looks best.. so here goes :
And walah! Boxed in Daiso's Rm5 clear display!
Hope you enjoyed reading this. Do follow this blog as well as our Instagram!

Instagram : Craftysupermom
Hashtags : #BoxOfHobbies #SupermomCollectibles

Have a wonderful day!

Sunday 16 March 2014

Tutorial : Thinking Pot by Wong Fu Productions !

 Isn't this guy adorable?! It's a little T.Pot !
A couple of months back (yea, my updates are always slow) I've decided to make more figurines.. and I did this! Thinking Pot by Wong Fu Productions! You can find T.Pot in this episode of Wong Fu Weekends : WFW 59 - Arts And Crafts! Now, you can make it too! It's fairly simple.

What is needed :
1) Clay (Pink, White)
2) Black Acrylic Paint
3) Thin Brush
4) Yellow Acrylic Paint
 First of all, roll out a white piece for the pot's base. Then, roll out a pink piece of clay ball and tap it gently so it flattens on 2 ends. Place both pieces together. Roll out a long white clay and wrap it around both the pink and white clay where it meets.
 Paint T.Pot's face! Use a thin brush and paint it's face with black acrylic paint. The eyes are a little far apart, and the eyebrows are frowning. Use yellow acrylic to dot the cheeks.
 Lastly, paint it's brain! You can paint anyhow you want, but I followed the picture on the very front. And tadaaaa you're actually done!
 T.Pot from Wong Fu Productions! Check them out on youtube!
Instagram : CraftySupermom
Insta Hashtag : #BoxOfHobbies ; #SupermomCollectibles