Thursday 21 February 2013

Tutorial : DIY Ribbon Organizer

Ribbons, ribbons, ribbons!
I've been collecting a whole bunch of ribbons from everywhere. I didn't buy them (ya right...) but they seem to just grow out of nowhere! 
Messy messy ribbons that would sprung out and dance into a pile of headache after.

And for that, I've decided to make myself a ribbon organizer!

What you will need :
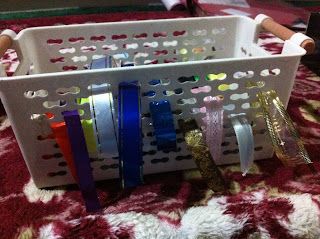
1. A container/box like the above (or modify a shoebox to have several holes)
2. Strings
3. Cardboard
4. Scissors
5. Ribbons
6. Circle cutter (optional)

So, let's get started! The first thing you do, is to tie the string to one side of the container/box. This piece of string is to go through the loops of your ribbon and make sure they don't move too far.
 Then, it's time to cut circles slightly bigger (This is very important. It has to be slightly bigger to hold your ribbon properly) than your ribbon's circumference. I used a circle cutter (you can buy them in your local book stores, else, hunt for Daiso). Poke a hole in the middle of the cardboard circles. I did that with a pencil and an eraser placed below where I want the hole to be. You can use anything soft to replace the eraser.
 Put the ribbons and the cardboard circles in such an order :
 Cardboard circle --> Ribbon --> Cardboard circle

Each time a ribbon is placed in, pull the ribbon out from the hole on the container or the shoe box.
Then repeat the order above.
 It will look something like this.
The reason why you need the cardboard circle for the ribbon organizer, is so that the ribbons do not come off and it would be hard to pull the ribbon out from the front.
 I used holes of different heights for different ribbons as some has a bigger circumference, and some has smaller ones. The DIY ribbon organizer is about done.
 Here's the other side where the smaller ribbons are. I didn't have that many, and thus the ribbon organizer is only filled in half way.
 Top view. My ribbons are placed randomly. It's alright to have it a little messy from the top view. You'll mostly be seeing the sides only. You can decorate a cover and place it on top to hide the ugliness too if you wish. And with that, the ribbon organizer is done!
 I love my DIY ribbon organizer! It has served me well so far. No more messy ribbons!

End.

Thursday 14 February 2013

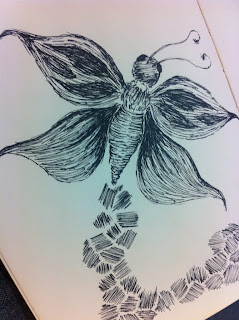
Sketching A Butterfly !

 A simple butterfly I drew while waiting for a friend in Pyramid early February.
3 person actually came up to me and say it's pretty or showed me the thumbs up sign. heh.


I'm a happy girl.
Just a simple post for today. Have a great day!

Handmodified Bling Jacket for G.I.Locket's Jessica Lew

Hello !! Happy Belated Chinese New Year! I really wished that I could update by blog during CNY, but my connection was really bad. So much for bringing my laptop and hard disk to gram's place. Oh well. It's great to be back and blogging!

That dress is what I wore during CNY Chu San (Third Day Of CNY). I bought it from a friend of mine who owns an online boutique - ChiqFliq ! Go check out what other goodies they have in store!

Here's the main highlight for this blog post! Recently, (well, actually it was before CNY) I've helped my sister transform her new plain denim jacket into a super blinged colourful jacket!
 This is the plain denim jacket.
For those who didn't know, my sister is a dancer. She and a couple of friends made a group called G.I.Locket where they do mostly kpop dance covers which you can see here.
 My sister chose the blings that she wanted and showed me.
 I added a few of my own and we started placing them all over the jacket. Yeap. It's THAT simple!
The rose and star were hand sewn from last time. I kept them in my little 'treasure box'.
 I have a box full of unedible M&Ms, and I thought it would be cool to bling one side of the colour with these colourful candies. Besides, what could go wrong with M&Ms? Everybody loves them!

I glued them down with my trusty hot glue gun!
 My sister said she wanted to add something more to the shoulder and arm's side, so we took out mom's old pearl necklaces and blinged that side. Too many tiny charms would look messy and less attractive.

We wanted to sew the necklace on, but then changed our minds as we thought it'd be cool to have safety pins just randomly sticking around on the jacket.
 Tadaaaa! The blinged jacket.

 Phew-phwit !!!
 Check out those awesome M&Ms ! That's my favorite part of the jacket!
The pearl necklace adds a really nice touch too!
 From the front. Shweeet!
I really enjoyed having this little project.
Yipee!
Since you've seen the awesome jacket, why not take a look and G.I.Locket's awesome dance cover teaser!

Check out more of their dance covers here on their Youtube channel!

P/S: It was such an honour to be able to bling a G.I.Locket dancer's jacket! *fans self like a overly obsessed fan girl*

Sunday 3 February 2013

Tutorial : Rainbow M&Ms Cap

 Hey everyone! Check my new cap out! It's covered in 3 rows of yummy colourful rainbow M&Ms! I think it's pretty cool and definitely suit any sweet tooths out there. I ain't a sweet tooth, but I'm already loving it!
 It's actually VERY simple.
All you need is :
1. Plain Hat
2. Non Edible M&Ms
3. Hot Glue Gun

If you can't find non edible M&Ms, you can use anything else from old pearl beads, to rainbow sequins, to different fabrics and many more.

 Step 1 : Get your hot glue gun heated up and ready
Step 2 : Scatter a bunch of non edible M&Ms and arrange their placing on the hat.
Step 3 : Carefully apply some hot glue to the middle of the colourful M&M pieces and quickly stick onto the hat where you want it to be. Start with the middle and work towards both sides.
Step 4 : Repeat till satisfied


Well, that is it! So simple!
I actually wanted to cover the whole white area in M&Ms, but the M&Ms are really pricey and I'm afraid the hat might add up to be too expensive. 

So tadaa! That's it for this simple tutorial. Hope you enjoyed it!
The product will be available soon at BoxOfHobbies! Only one available.