Saturday 28 April 2012

Watercolour Painting


 Hey people! Where did those pictures come from? I was fooling around with the webcam this morning. It's actually the first few pictures I took with my webcam though I've had it for 2 months already! Anyways, I don't have much to blog about today, but here's something I've been doing.
Comm Tech classes in college has been pretty likeable for me these days. We're using Adobe Fireworks to create webpages. One of our assignments is to make a website to promote ourselves as graphic designers and so on, showcasing our previous works. And so, I've came up with a few sketches (shown above). I've decided to use watercolour (colourful waters) paintings to put up for the background. I want something more original and unique in my page. Besides, I plan to use this for BoxOfHobbies in the future if I can and what's better than having something done by yourself?
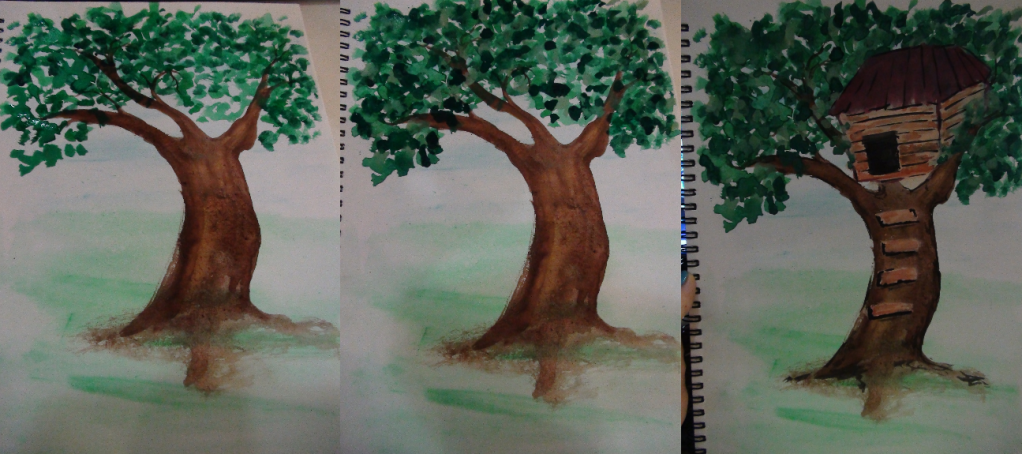
 Progress of the bare tree to one with a treehouse in it. Forgive me, I don't do a lot of water colour paintings and so the paintings are not very pretty. Still, I'm satisfied with the results.
Another 2 paintings I did. The tree was for the "Home" page, the moonlit river for the "About Me" page and the rainbow is for the "Work" page where I showcase my previous works. I've already done these 3 pages in Adobe Fireworks adding the buttons and rollovers and such, but I didn't have any picture taken for it yet. So stay tune to see the final result! This morning I just did 2 more paintings for comm tech - hot air balloon for "Contact Me" and a field with a windmill for "Experiences". Well, that is all I have to show you guys today! Thanks for reading!

Thursday 26 April 2012

Paper Plane Nails

Hey lovelies! *If you're a guy, I apologize for calling you lovely.* I've been drooling over a lot of things lately. It's funny how I suddenly fell in love browsing through make-up and nail stuff this year. I guess I love browsing through these stuff because I like art and I find all these things artsy. Somehow, I love those 'kua cheong' make up and not the usual basic make up. I wouldn't mind being a model for that purpose if anyone needs me. haha! I'm a girl who is very unlikely to be caught wearing make-up. I seldom apply nail polish too (never did last year), but this year, it's already my second time applying nail polish! Ah, so much chattering, let's get back to topic. Yesterday, I came across a picture of paper plane nails and I decided to try it out myself.
 
The base colour is painted. Nail polish belongs to my friend.
 I didn't want to paint white then add the black lines on my nail, so I tried something different. I drew the paper plane on this sticker and tried to stick it on. I then applied 2 coats of craft varnish since I ran out of the transparent nail polish top coat. It didn't work that well though. The surface of the paper plane is smooth, definitely covered, but somehow there must be a hole somewhere for the paper actually got wet and was ruined (not the whole plane, just the top pointed end) as I took a bath. It didn't look that good anymore, so I tried something else.
 I found silver polish and started taping my thumb according to the left over sticker piece paper I used previously. The surface of the paper was gone but the sticker base was still there as I did this.
 and so, I have a silver paper plane on my thumb! I used a pen to draw the dotted lines. I wish there's some sort of pen polish. It would make life much easier.
 My 'pen polish' didn't dry that easily though. It got smudged halfway through. I didn't bother repainting it right away for I was at college.
The 4 other nails of mine. Ain't it cute how the lines are somewhat connected? That is all for the nails.  Here's some BoxOfHobbies items I made today :
I really love the last picture with the couple. I think it's sweet and lovely. All these things above will soon be sold at BoxOfHobbies ! Praise God! For sales are starting to come in at a slight faster rate.
Oh! Let me show you a little something I made for myself! If you came for Chromeheart previously, you'd probably know what it is. Else just read the name on the bottom right.
It's an Esuirras Warlods necklace! I made this for I was a warlord for Chromeheart Revelation and this brings back memories. I love it so much!

Alright! That is all for today. I have more stuff to show you guys, but I'll reserve that for tomorrow! Thanks for dropping by! Tata!

Monday 23 April 2012

Mysterious Blue Egg

 *Randomly shows off baby picture*
Hey guys! Today's post is about a mysterious egg! Most of you probably seen the picture of the end result already, but here's the steps in making it!
 Collect a regular egg shell.
 
 Get some clay and start mashing them up! You could play 'masak-masak' while doing so too!
 Roll the green clay into long strips and start curling it around starting from the very bottom. Overlapping is fine. Once you got the base, add some grass too!


 It'll turn out something like this.
 Start cracking the egg. You'd most probably want to paint the egg before this though. It would be much easier compared to what I did (making the creature first).
 A poor empty little egg shell with nothing inside. Let's fill it up!
 
 And the baby creature was born!

 
 How adorable! The creature sits snuggly in it's cosy blue shell. He was for sale on BoxOfHobbies for only Rm10 and has now found a lovely new owner!

This was actually made for an international clay craft competition. I never thought of winning or so, but it sure was fun just to join in! It's also the reason why this blog post came by so late when it was done about two months ago. Pictures or videos were not allowed anywhere in the net till the competition ends.Well, that is all for today's post! Hope you enjoyed reading it! Toodles! ♥

Friday 20 April 2012

Leopard Make Up Box

Hello everyone! I'm here to show you a little customized order I've been working on! I loved how the whole thing turned out and I had a lot of fun experimenting on how to make it. I hope you enjoy the post!
 First of all, I took a plain box (it was dark blue) and sprayed it completely white. If my box stayed blue, it would be too dark to show my base colour which is yellowish brown. I painted the base and then mixed some colours to get light dirt brown. Random spots were painted on the box and left to dry.
 Plain brown spots and brown spots with black patches.
 I added a couple that is completely black. I think it looks pretty good.
 After painting the box, it's time to make the eyeshadow box! 
Shoutout : Thank you to the gentleman who helped me get my mirror out of the real eyeshadow box!
I couldn't find places nearby that sells that small of a mirror itself. I know craft shop sells them, but it's all further away and I wouldn't have time to go there and buy some, so I decided to drop by Daiso to get a real eyeshadow box just for the mirror. RM5 mirror. Since it was together with the actual eyeshadow box, I had to break some parts of the plastic box to get the mirror out. A really really nice gentleman helped me with that. Thank you!
 I decided to use the shades of red for the eyeshadow.
 To make it more realistic, I brushed on some real eyeshadow. Don't worry of it falling off though, a coat of varnish held it in place.
 The eyeshadow box was pretty much done. I decided to make a small brush and a pencil. In the picture above, I was trying to make the head of the pencil. I had a colour of 'fails' then. It isn't as easy as it looks. Many times, I had abnormal wave lines where the lead and the 'wooden' part meets.
 The 3 little objects made. It is to be placed on top of the box.
 The inside of the box. A small red purse sits on the bottom right corner.
And, the finished product :
 A simple box, all redecorated and dressed in a lovely ribbon. 
I hope you enjoyed reading this post of mine as much as I enjoyed writing it! Love you guys! Bye!


Monday 16 April 2012

Peacock Nails

Hey people! Told you I have peacock nails! They aren't painted very smoothly, but I still like it. Light blue, turquoise and purple! The 2nd coat was not painted on then.

 A little charm bracelet by BoxOfHobbies. My friend bought them all right after laying her eyes on them. 

Here are a couple of RM9 pendant necklaces :


That is all for today's post! I hope you enjoyed the picture-filled, word-less post today! Bye!