
Hi everyone! I have a really interesting post today! (Or at least, I find it interesting myself)
I'm going to post a tutorial on how to make an Egyptian headpiece! I made it for my college's Halloween dance party.

I only got to make the headpiece on the day itself after classes which was about 2:30pm. I went to the hardware store to get gold spray paint first, then head home to start making.
Let the tutorial begin!
What is needed :
1. Gold chain (can obtain from old necklaces)
2. Nice looking pieces of old jewelry/special ribbons
3. Beads
4. Headpins and jump-rings
5. Pliers
6. Gold Glitter
7. A heart full of love and patience

I started out by taking off the hot air balloon from my necklace. Then, I hooped the chain around my head to measure the size. (The top right of the picture shows my head size). I held it in place and cut them with pliers. Use the existing chain hoop or a jump-ring to connect the two wanted ends back.

After measuring and cutting, get the extra chain and connect them to the middle of the headpiece. This is for the dangling beads in front.

I placed each bead on a headpin and used a round-nose pliers for the top.

The first big bead connected with the extra chains.

The remaining beads added with only the headpin and jump-rings.
When this is done, it's time to add strands of gold on the side of the Egyptian headpiece.

Hunt around the house for a few of things that may seem suitable for the sides. I found these silver things at home and decided to use them. (I always keep rubbish so that one day they may have the opportunity to turn into treasures)

I lay down recycled papers outside and the 'special ribbons' on them. Because they're silver, I bought Anchor's gold spray paint to cover the silver. It was not shiny enough, so I took gold glitter and sprinkle all over.The shinier you want your Egyptian headpiece to be, the more glitter you add.

It was raining then and I had no choice but to do it then cause the party's that night itself. So, I used an umbrella to block the rain. After applying glitter, I sprayed a few layers of gloss to keep the glitter on the strands.

The lovely golden strands.

Check out how I hung my necklace as to add the gold strands and to make sure they are about equal on both sides. Slowly add the gold strands to the Egyptian headpiece with a jump-ring. If your strand does not have a loop, you can try using hot glue gun to attach the jump-rings to the strands first.

And with that, the Egyptian headpiece is done!
Here's what it looks like with my makeup on.
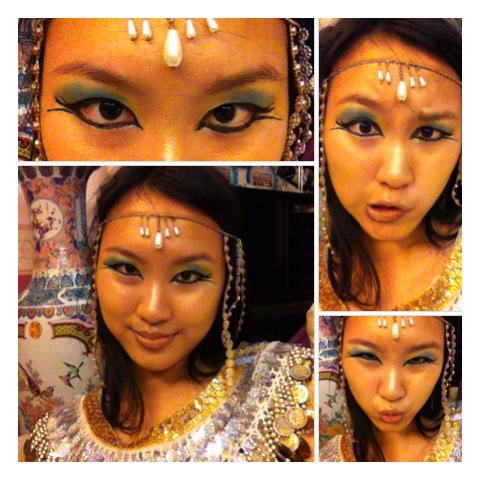
I did the makeup myself too! It's only my second time doing make up after helping Shaujin last time.
I'm so happy with the result. I made my face 'gold' as well by smudging yellow eyeshadow around. I'll share with you about the makeup another time.


Sometimes girls just want to be girls! Especially when they're all dressed up!

I love my Egyptian headpiece! That's all for this post. I hope you enjoyed reading it as much as I enjoyed making it and writing this post! Bye!
I like this tutorial! I featured it on the Jewelry Making blog at Craft Gossip!
ReplyDeletehttp://jewelrymaking.craftgossip.com/egyptian-headpiece-tutorial/2013/09/24/
Wow! That's awesome!! Thanks Mardi!! <3
Delete