Thursday, 29 November 2012

Egg Shell Baby

 Hi everyone! Here's a simple update on making a baby in an egg shell!
I wanted my baby to sit in an adorable egg rather than an ordinary chicken egg shell. So, I painted it! I did mine with white, sunny yellow and baby pink.
 To fill in the space in the egg shell, I wrapped some felt over aluminum foil.
Here comes the baby! 
 Baked with eyes added! How adorable!
That's all for today! Tata!

Tutorial : Vampire Themed Card

Hi everyone! I have a very simple tutorial for you today! It's the Vampire Themed Card!

What you will need :
1) Card base
2) Scissors
3) String
4) Hot glue gun / glue
5) Manilla Card
6) Pen


 Step one : Fold your card base into half !
 
 Step two : Cut two strings. One long enough for the top of the mouth length, and the other longer than the first to form a smile for the vampire. 

Step three : Prepare your hot glue gun / glue.
 Step four : Hold down the strings in place forming a smile and glue them down. Do so on both sides of the vampire smile.
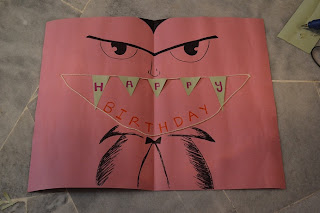
 You will end up with something like this. It doesn't look like a vampire's smile yet, but wait till you add the teeth!
Step five : Cut out some paper teeth (It can be coloured paper teeth too). Glue them to the string. I used hot glue gun as it's much easier, but you can use any glue available.
 If it's for a birthday, you can do like what I've done here.
Step six : Draw out your vampire ! Do seek a computer (google)'s help if you are not sure how to draw a vampire.

 Step seven : Make sure it works. Close the card and make sure the string doesn't go outside the card, and then open if to see the ginormous vampire smile with sharp teeth!

Step eight : If at step seven, the string of teeth comes out of the card, use your glue to glue the sides a little more inwards. That way, it will be steady like how you want it without cutting and re-adding the strings for the mouth.
 That is all for this simple card! You can cut out black bats and frames of them to make the cover!

Sunday, 25 November 2012

Tutorial : DIY Branch Stand For Accessories

Hey everyone! 
I haven't been posting for a couple of days as I was figuring how to expand my photo space. They didn't allow me to upload any more photos because I have reached my 1GB limit, and you have to start paying for more space. Luckily, a friend of mine who is a fashion blogger told me I could invite other authors to write. So, I invited BoxOfHobbies and am writing in a different account now in the same blog! Yipee!

I hear if you connect your blog to Google+, you get unlimited space though. I'll see if that works out soon. Well, here's a short simple tutorial for you!


 What you need :
1) Tree Branches
2) Tape
3) Plastic cup with a lid
4) Any small decorative pieces
5) Blade
6) White paint / spray paint

Step One : Take the few branches and paint them white (Pick the branches with more splitting ends, those help to hold more accessories). Then, gather them by taping the ends together.
 
 Step Two : Cut a small circle out of the plastic lid big enough for the end of the branches to go through.
Step Three : Hold the branches with one hand (Else it would fall) and start pouring in your small decorative pieces through the little hole where your branch pops out. You can also lift the lid a little to pour in, then finish up with the little hole on the lid.
 Filling it up with some red seeds I collected long ago.
 Step 4 : Make sure it is stable. If not, you can always add a stone at the bottom.
Step 5 : Dress the tree up in pretty accessories!
Tadaa! It is THAT simple! Best yet, the materials are easily available everywhere!
So, have fun and enjoy making your very own branch stand!

Bye!

Monday, 19 November 2012

The Beginning Of...

 
 Hey everyone! How are you? I've been an air stewardess lately!
 Nah, just kidding. I love this dress. The ribbon on my neck is actually for the waist. It's sewn to the dress itself, but could reach my neck and tie a bow! I like how it looks from the front. It's a little funny from the back though.
 'Add New Product'? Hmm? What's going on?
 BoxOfHobbies is going have a website of their own! I'm really excited about this. A lot of needs to edit and put up, but it's all going to be worth it! I'm not too sure when I should launch it though. Perhaps I got to get more products in first. But that would take some time.
 Sneak Peak. In this picture, I haven't published everything.. just a couple of items for trial run.
I'm excited about it. How about you? 

I don't have much to talk about now as it's a tinsy bit busy season as well. Finals is next week and I'm actually going to have a test today! Yikes! Well, I'll update you again soon. That's all for today.
I love them.

Bye!

Friday, 16 November 2012

Lovely Rainbow Hearts

 Hey beautiful readers! Meet Ariana! She's from my children's church. I haven't seen her since the old church and was pretty surprised when I saw her. She's grown so big.
 On the left was when we were still in the old church, and on the right is her now!
Look at how much she has grown.  (':

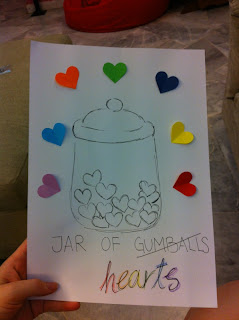
From the previous blogpost, I mentioned that I had a lot of leftover hearts!
 Here's what I did with them :
 I really love this piece. A simple black and white drawing with a bright red heart spreading love.
 A Rainbow Love Tree
 So they say, 'Love Takes You Places'. I wonder if that is true.
I love how the rainbow behind the words turned out.
 Can you spot the tiny snail?
 A jar of gumballs?

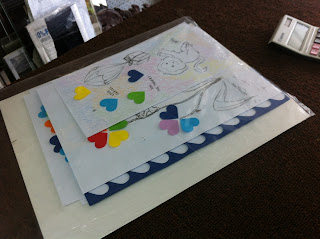
There are two more which I forgot to take a picture of before sending them off to be framed.
 Choosing the frames.
 
 I'm so excited for everything to be done! More pictures will be up next week when they return!
That's all for now. Hope you enjoy the rainbows! Bye!


Wednesday, 14 November 2012

Tutorial : Framed Rainbow Hearts

 Hey everyone! Today is a really beautiful day! What's more beautiful is that I have a lovely rainbow heart tutorial for you!

Here's what you will need :
1) Printed heart according to a size you would like / Heart puncher
2) Coloured papers (red, orange, yellow, green, blue, dark blue, purple)
3) Scissors
4) String
5) Photo Frame
 6) White A4 paper
7) Scotch Tape
8) Two Rulers
9) Double Sided Tape
10) Patience

 I love rainbows, don't you?
 If you have a heart puncher, go ahead and punch your way through. I didn't have any, so I decided to do it the traditional way - using a printed heart and a scissors.
 I thought the red cut outs were pretty, so I decided to keep long strips of them after. Note that for this tutorial, only about 4-6 hearts are needed depending on your likings. I cut of extra because I fancied the strips of love (below).
 These are only a few of the cut-out hearts. I actually have more and spent 3 hours cutting all of them!
 When you're done, use scotch tape to firmly stick your A4 paper to the frame. In my case I have a border that came with the frame, so I stuck it to the border.
 Remove the frame so that there is more hand space to work with.
 
 I only wanted the hearts in the middle. So, I measured the sides and used a thin rope (you can use ribbons or any kind of strings) to draw temporary borders.
 To paste the heart, cut a small bit of double sided tape and paste it in the middle of the heart where the folded line is. That will allow your hearts to fold outwards a little at the sides and make it look as though they're popping out a little.
 The middle is always the best place to start. It helps you keep an eye on the other two sides if they're balanced. The first row of hearts have to follow the measurements on the ruler.
Calculate the full height and width of the box, minus (heart size x 7) and divide by 8 again (Do this one at a time, which means height first, and then width). This will determine the space to leave in between the hearts and includes the first and last space between the temporary rope. If you don't want a space between the ropes, divide 6 instead.
 
 For every piece of rainbow heart placed, I use two rulers. One placed horizontally and one vertically. Both of them are to ensure that the alignment is right. I found it easier to measure the horizontal one by following it's shadow instead of the ruler itself.

To measure the vertical one, just follow the folded line from the first row of hearts.

 They're almost filled up!
 And done! The entire thing took me another 3 hours to align and paste. So it has been a total of 6 hours including the cutting of the hearts. I do have a lot of extra hearts though, since I only used 4 from each colour. They shall be turned into a different art.
 
 You may now take the rope off and admire your beautiful rainbow heart artwork!
When you're finished with everything and cleared all the mess, give yourself a huge pat on the back! Frame it up and give it more love!

My inspiration for this came from something I saw online, and also the quote "The rainbows in the sky show that God's promises are true."
That's all! Thanks for dropping by! Love you guys! Bye!