Sunday, 11 August 2013

Tutorial : Clay Baby Minion

 Here's to the minion craze! Om nom nom nom! Minion cupcakes are uber adorable. Don't you agree?
I wouldn't really eat them though. Everything on top is made of fondant (An icing-like substance made of sugar sugar & sugar, and used for decorating cupcakes,cakes,pastries etc. It's similar to clay whereby you can mold it into any shape you want) I could use fondant to make little sculptures instead of clay, but I'm just lazy to keep those sugary ant-attracting figures.
In this post, I will be showing you how to make a clay baby minion!
 First, I rolled out some yellow clay to a slight oval shape. I marked where the eyes and mouth would be on the smoothest side.
 Then, I rolled out a long piece of grey clay (mix of black and white clay) and pressed it gently to form a flat side. I rolled two white eyeballs and had the grey clay wrapped around the white balls of clay and put them aside.

I rolled a bigger piece of white clay through my pasta machine (you can use a rolling pin if you do not have a pasta machine) at no.2 and wrapped it around both ends of the minion body. One side for the head, and the other for the body. Roll out tiny pieces of black clay into the minion's shoes as shown in the picture above. Then, attach eyes by rolling out uber tiny pieces of black clay into tiny balls and lightly press on it against the minion's white eyeballs.
 I rolled out small black pieces (slightly bigger than the minion's feet) and shaped it into a triangle shape. Use a scissors to cut two straight lines. Watch out not to cut fully or you'll just have minion fingers. The edge would be a little pointy, shape it with your finger by tapping lightly on it. Leave it aside.
 The whole thing should look something like the above. (Hands not attached yet)
 Cut out tiny heart shapes with your blade on blue clay, or you can always shape tiny balls of clay into a triangle shape, then use a metal stick/blade or anything thin and long to push halfway down the bottom of the triangle. Shape the sides, turn it upside down, and you should get a heart. Repeat to make four.

For the fluffy ball on the very top, make a base first. Roll a medium ball and many tiny balls of clay. Stick all the tiny balls of clay onto the medium ball till all is covered as shown above. Stick it on the top of the baby minion's hat.
 
 In the picture on the right, you can see that the baby minion has safety pins on his diapers.
 Roll a very thin long grey clay. Cut into size (one long one short). Bend the long piece to form a U shape. Then use the short piece to connect the bottom of the U. You get sort of an inverted A shape, but rounder.
 Roll out a small ball of maroon red clay and press against the mouth area (it's ok to see a bit of white from the mouth, in fact, i think it'll be nicer) to make the baby minion's pacifier. Then, roll a very long thin maroon red clay and strap around the baby minion as so. Cover up the middle of the pacifier with a short thin piece.

When that is done, roll 2 long pieces of yellow clay for the arms. Attach it to the black part of the hands made previously, then to the body. Careful, it's pretty fragile. You can use glue or a small metal piece to connect the hand to the body.
 The strap goes all the way to the back.
 Baby minion sideways.
 And tadaa! The baby minion should look something like this!
How adorable! I really like how it turned out. What about you?
Probably the eyes could be stuck closer to one another. Other than that, I'm pretty happy.

For more experienced clay molder :
Summarized Baby Minion Tutorial Pics


Check out my other accounts :
Instagram - Craftysupermom
Fb - BoxOfHobbies

You can visit BoxOfHobbies for more updates or customized orders!

Friday, 9 August 2013

Mini Minion Earrings

Crafting is my spirit animal. If that even makes sense.
Anyways, hello again! I have been missing for a while due to the annoying laptop of mine ): It caught a flu. A flu whereby it became a professional wifi detecting device, BUT suddenly could not detect the wifi it has been using it's whole life. I'm not talking about bad wifi connections, but a really odd thing where my laptop can detect everyone else's wifi except my own. It's still sick and I'm currently using daddy's laptop for this post.

For those of you who have been following my Instagram account : CraftySupermom , you would know that I've been following the minion trend!
I mixed several yellow clay with a bit of white to get a nice minion yellow colour.
I was really excited about the idea of having little minion faces on people's ear that I stamped a whole bunch of little circles out.

After doing so, I rolled out thin black straps and tiny eyes for them. I was excited to finish them all that night, but had to go for an event.
 
Sadly, after the event, my fire on making little minions died down. So I only continued finishing them up days after. Whoops.
It kept lying there on the table for days till I finally decided that it's taking up space and annoying me sitting there. So yeah, I decided to finish them up! Woohoo! They are now glossed and ready to be sold real soon!

They'll be up on BoxOfHobbies in a while! (:
If they don't, blame the evil internet :P haha!
Well, that is all! Don't forget to follow me on the right side of this page and on Instagram " Craftysupermom

Tata!

Friday, 26 July 2013

Handpainted Dog Mug

 Aloha! I love my blue-green hair!
Moving on...

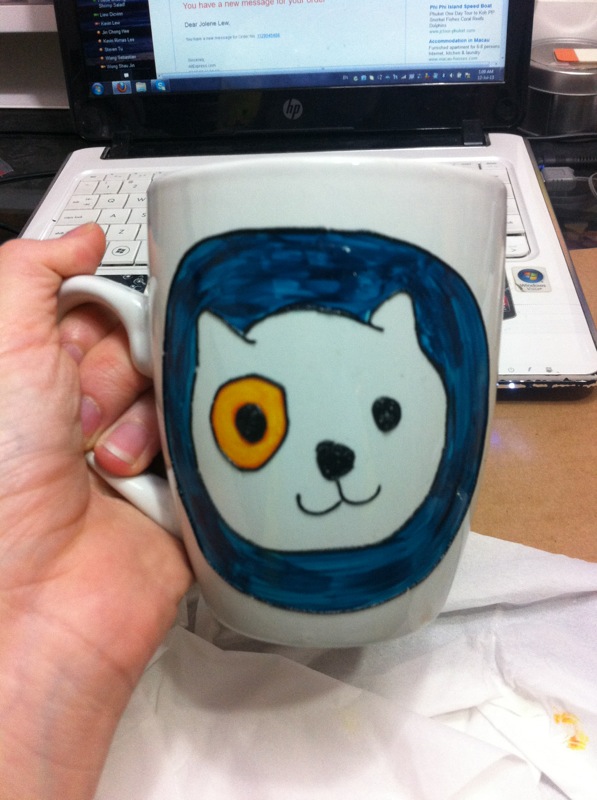
A customer recently ordered a customized dog mug. I haven't been painting on mugs for a while. It's pretty fun to get back at it. You can find my previous works here!
 The customer sent me a link to a cartoon dog and I did my very best to draw it freehand. 
 The dog had no expression in the picture.
 So we changed and made him smile.
When that was done, we filled everything else in with a special paint for ceramic.
 I really love the colours. They really stand out from the white mug. 
 This was written on the back.
When all is painted and done, I baked the mug at 160degrees for about 20minutes in my craft oven.
The paint would then be permanent, and the cup can be washed gently (no scrubbing where painted) or washed with a dish washer.
Tadaa! The completed cup!
I think it looks great! What do you think?

Sunday, 14 July 2013

Experiment : Operation Teddy

Months ago, I got an evil genius plan to turn stuffed toys into deadly adorable heat packs!
Knowing that most hot/cold packs comes in a common shape, I wanted to make adorable ones available for all (especially the ladies). A couple of my friends have the habit of using heat packs when their 'friend' visits them every month. So I thought, why not?
I dilly dallied till a million gazillion years later and finally picked up my razor sharp scissors to test on this little bear who has been patiently waiting for it's turn in the operation room for months.

 Surgery was to remove majority of it's 'fats' from it's body.
The overflowing bowl of fats.
The fats were replaced with something we call 'uncooked rice'
They are known to be able to absorb and remove heat fast. And thus my experiment. People usually add a touch of essential oil in this process, but I was too lazy to get them without knowing if this experiment is successful.
Dear Teddy survived. Needle and threads were used to stitch little Teddy together again.
Now to see if the experiment works.
Teddy was placed in a sauna room.
A moment later, teddy was taken out. It's warm, but lasted only for a while.
Experiment was pronounced 'Fail'
I assume that teddy's fur is too thick and caused such a result. Though the experiment failed, teddy's now a 'bean bag' teddy standing tall with it's heavy butt grounded to the table.

That's all. The end.

Tuesday, 9 July 2013

KL Towerthon 2013

Hey everyone! Here's a little something from May 2013!
Following up from my very first marathon : Neon Run 2012 , comes the Towerthon 2013!

I never really bothered going for even the simplest form of any exercise since Neon Run. Then again, I never even exercise or trained FOR Neon Run in the first place. Towerthon never came in mind at all till this guy dragged me along.
A photo after both our Towerthon.

It was my first time having this adorably odd device on my shoe. (It's still on my shoe now - 09/07/13)
I find it amazing that this tiny flat piece of thing could help track how fast I ran. It records the time you pass the starting line, and when you pass the finishing line.
The guys ran before the girls did. A friend and I climed up the towerthon track earlier to take a shot of the people running down there.
Yeap. We're going up that thing... by stairs.
 *gulp* Because we are going up by stairs, no one was allowed to cut cue UNLESS one decides to stop. The stairs only had space for people to walk up two by two. If someone really can't take it anymore, they always have levels on each floor to rest. For Towerthon 2013, I only ever stopped once. I walked in the room at T-17 (if not mistaken), was pacing around (not wanting to sit down which will make me cool down fasters) and went back out when I realize what for I pace around here when it's similar to me when I keep going up the stairs. So without staying long, I was out and ready to continue.
Tadaa!! I manage to have a shot by the official KL Towerthon Photographer! 

We both were extremely happy to finish the Towerthon and get our medals. We decided to celebrate with the AWESOMELY FAMOUS BEEF NOODLES!
You got to try it out if you haven't. I preferred the dry noodles for the taste is stronger compared to the soup noodles.
Some photos to remind me of my Towerthon days in the far future.
My awesome medal.
Journeying with the Guinea.

And...
I...
am...
Superbly
OVERJOYED
when the results came out :
Among the women category that I joined, I was the no.69th girl who finished out of 452 people! With no training at all, but brain power to not give up and keep going. Oh yeah! I love my brain.

Right after Towerthon is done, I never exercise or train again. Undisciplined-self.
Oh well. I've signed up for Standard Chartered run too. Bib name : Winning Potato

Well, I guess that's all for today. Thanks for dropping by. Bye!

Wednesday, 3 July 2013

The 'Scary Doll' Makeup

Hi everyone! I'm did a little face magic last week.
I was helping a friend as a model for her class work by Sense & Style. It was pretty fun.
This half was drawn by one of the teachers in Sense & Style. Today's makeup look will be 'The Scary Doll'
The lips were made pointy. Yikes!
The picture on the right shows the makeup without the fake lashes on the bottom lid. The fake lashes really makes a huge difference huh.

The completed look :
Scary enough for you?
My makeup artist :
 Thanks Rachel for the awesome makeup experience. It was fun.
 
A couple of photos taken for Rachel's portfolio. I like the one where my eyes are closed.
Tadaa!

And that's all for now folks! Toodles!