Friday, 28 June 2013

Handmade Lizard Softie

Hi everyone! I'm back to my craftiness!
My laptop was having problems with internet connection, and I found it very troublesome to upload my photos from my iphone to the computer.

Without fixing anything, about a couple of weeks later, my laptop revived itself. Odd. Just as I was about to reformat the whole thing.

Anyways, here's a little something I created.
 No, it doesn't just look like this. It's supposed to be flipped the other side! I cut out my templete and sew the sides together. Leaving a space where the butt is.
 Tadaa! This is what it looks like after flipping it inside out and stuffing a whole lot of white fluffs into it. The hands and legs were the hardest to flip inside out since they are so tiny. I got the help of a needle holder.
 The idea of making this little lizard here was inspired by a colleague. No, she didn't suggest for me to do so. In fact, the idea came because she was so afraid of lizards! On the day before her birthday, I wasnted to sew a puppy. It didn't turn out well. I modified it, and it looked like a lizard. I add finishing touches and walah! A new lizard soft toy. I think it's destined to be my colleague's. And so, I gave her.
 Adorable little pink lizard!

That is all for today! (: Thanks for dropping by!

'The Sanhedrin' ; The Making Of The Shield

A few behind the scene photos presenting the making of the shield from 'The Sanhedrin' by CHCKL.
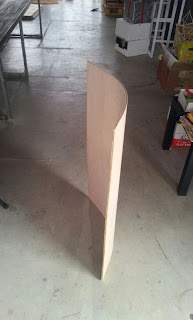
In our previous production "Chromeheart", the shields were made flat. But this time round, we decided we want our shields curved.
And so, we starting figuring how we can bend the wood.
Our handsome props team trying out all the methods that they could think of.
We finally manage to find a successful way after many failures. The bending of the wood takes a lot of time. And we could not make a bunch of them in one go as we lack certain resources.
When that was done, the handles for the shields were fixed up with nails.
The shields were then painted, buffed and we did a final touch up.

These are how they looked during production :

That's all for today. Tata.

Sunday, 23 June 2013

'The Sanhedrin' Priest Necklace

Hi everyone. Here's a behind the scenes post on the making of the props in 'The Sanhedrin' by CHCKL.

The entire production was a great success! Today, I'm going to show you how we made the Priest Necklace Some people call it the Candy Crush Necklace. It’s extremely colourful and gives a burst of joy.

Because of my busy schedule, I was not able to help much with the swords or the shields then (which will take way more time). And thus, I was given the task to be in charge of the priest necklace. I had no idea where to start or what materials to get.
 Our references came from the above. I initially thought of ping pong balls, but they were too big for the necklace and would look horrible. So, I thought of the one thing I always use - clay.
So I made the little paper clay balls at home thinking it would save time when I head over to church to work with the others. But found out later on that the size was still too big. So, we had to remake them. In order to save money, we used tissue & PVA glue instead. Half pack of clay would be wasted if we were only to use them on these.
We had a small team of about 3 person. And occasionally help from other volunteers. As someone tear, soak & rolls up the little tissue balls, another person measures and fix up the outer frame of the necklace. We used a lot of newspapers & masking tapes for this.
All the balls were placed in the frame for measuring to have a good fit.
We added a cardboard on the back of the outer frame, and covered the entire thing in PVA glue and tissue. For every layer, we had to leave it overnight to dry. So, this part of the necklace took a much longer time to be done.
 While waiting for the base to dry, we coloured the little white tissue balls into different colours. Each colour has a unique name and meaning. They are also arranged into proper placings. Unfortunately for us, a few sites gave different information, and we had to pick one and stick to it.
The colourful bunch. We have two of each colour for two different necklaces.
When the base & the frame is dry, we painted them in two colours, and added tassels to the bottom. It made the necklace even more adorable!


The best feeling came when we stuck all the colourful tissue balls on the necklace base and saw how great the whole necklace look altogether.
That's me in the background after finish sticking all of them in place. It was a really fun project to get done. And very satisfying to the heart. I never knew it would turn out so adorable.

That's all for the post today. Thank you.

Saturday, 8 June 2013

Tutorial : Washer Pendant

Washer Pendants!
Washers can be easily be found in hardware stores. You can also recycle them from helium balloons where they are used as weight to hold the balloons down.

Trace around and inside of the washer pendant on a coloured patterned paper.
Of course, you can use plain colours or other designed paper (map,magazine,etc).
Cut the paper out and glue it on the washer. I used tacky craft glue for this.
 Then, I used some Dimensional Magic Mod Podge (you can get them form craft shops) and applied it on top of the patterned paper.
My pink washer's overflowed and I had to cut the middle out with a blade. If this happens, you can always smoothen the sides after cutting the small circle out.

The blue one went pretty well.
The mod podge dries clear (but I noticed the patterned papers got soaked a little and didn't turn out as nice)
and you have washer pendants which you can use as a necklace! Great fun for children as they can decorate it themselves too. Add sequins, beads and many more!
I super glued the strings to the washer pendant.
That is all. A very simple tutorial on washer pendants.

Friday, 7 June 2013

Tutorial : Jet Packs For Children

Jet Packs! Woohoo!! So sorry for the blur photo above, but yeah, that's how the jet packs will be. It's real simple to make and a whole lot of fun!

What you need :
1) A pair of 1.5 litre bottles (same shape preferred)
2) Grey spray paint (or any colour you want your jet pack to be)
3) Coloured paper for fire (Red & Orange?)
4) Hot glue gun/Tacky Glue
5) Square Cardboard Pieces
6) Strings/Ribbons
7) Scissors
8) Double sided tape (strong)
9) Patience & Love
So we started of spray painting all the bottles. Yep. We made a lot of jet packs. It was for an event.
They'll look like this. Try to even out the paint by spraying further away from the bottles, but with several layers.

Cut out a square piece of cardboard to fit both the bottle's middle section in. Notice that the board at the back doesn't peep out too much on the sides?

Before sticking them down, poke four holes on each corner. Loop a ribbon on the right side, and another on the left. This acts as the loop to slip the child's arm in. Side can be further adjusted later on.
Next, cut out a large piece of fire and a small piece of fire. Both of different colours as shown on the picture.
You can try making the fire in different colours with different texture. This on has a glossy effect.
You can also make them in un-matching colours.

Here's the bunch of jet packs we made..

Pretty neat eh? Here's one of my favourite picture of the jet packs :

All of them stacked up together in my craft room! Aww. Imagine the kids zooming around the room or garden. How adorable.

Well, that's all for today! Hope you enjoyed reading! (: