Thursday, 29 August 2013

Tutorial : Minion Badges

So before the minion craze goes off completely, here's a little tutorial on making your own Minion Badges!
 It's fairly simple. Especially if you have a round cookie cutter.
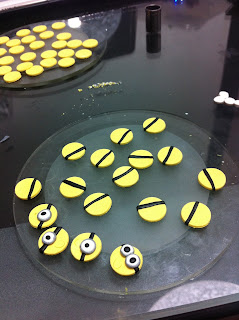
Start out by flattening a large piece of yellow clay. Cut out as many yellow circles as you like for the minion's face.
 Then, roll out flat pieces of black as well. Cut them into strips as shown above to be placed across the minion's face. When that is done, cut out smaller grey circles for their goggles frame.
 As you can see, another white piece is rolled out, cut and then attached. I used a pen cover to cut this out.
The black pupil has the same volume as the white, except that it's rolled up into a ball and slightly pressed instead of rolling out into a flat piece.
 Acrylic paint works great for the mouth on a sharp-tipped brush. The bunch of minions made.
A few of them after being glossed!

That's all for today. Thanks for dropping by!
Instagram : CraftySupermom

Monday, 12 August 2013

Mushroom Bacon

Hey everyone.
When I was a little girl, I dislike mushrooms. All kinds of them.
But surprisingly, at my age now, you can say I'm can be sorta crazy for them sometimes.
Not all kinds of mushrooms maybe, but well, it's still a big difference from before.
 The other day, I went out with my dad to buy groceries, and I took like.. 5 packs of mushrooms.
That was all I took. Nothing else.
One day I was hungry, and randomly decided to cook my own bacon mushroom breakfast! I didn't know what I was doing or how to cook them, but I just tried.
I chopped majority of the mushrooms into slices, but leave a few smaller ones to cook as a whole.
I fried bacon to add to them.
And the food actually turned out real nice! I was quite happy with the result.
The egg you see there is actually a quail egg. I ran out of chicken eggs.
Nom nom nom! Doesn't it look good?
Now, whenever I have nothing to eat in the morning, I'd cook my own omelette or if mushrooms are available, I'd make something involving them. Mushroom Omelette maybe?

Sunday, 11 August 2013

Tutorial : Clay Baby Minion

 Here's to the minion craze! Om nom nom nom! Minion cupcakes are uber adorable. Don't you agree?
I wouldn't really eat them though. Everything on top is made of fondant (An icing-like substance made of sugar sugar & sugar, and used for decorating cupcakes,cakes,pastries etc. It's similar to clay whereby you can mold it into any shape you want) I could use fondant to make little sculptures instead of clay, but I'm just lazy to keep those sugary ant-attracting figures.
In this post, I will be showing you how to make a clay baby minion!
 First, I rolled out some yellow clay to a slight oval shape. I marked where the eyes and mouth would be on the smoothest side.
 Then, I rolled out a long piece of grey clay (mix of black and white clay) and pressed it gently to form a flat side. I rolled two white eyeballs and had the grey clay wrapped around the white balls of clay and put them aside.

I rolled a bigger piece of white clay through my pasta machine (you can use a rolling pin if you do not have a pasta machine) at no.2 and wrapped it around both ends of the minion body. One side for the head, and the other for the body. Roll out tiny pieces of black clay into the minion's shoes as shown in the picture above. Then, attach eyes by rolling out uber tiny pieces of black clay into tiny balls and lightly press on it against the minion's white eyeballs.
 I rolled out small black pieces (slightly bigger than the minion's feet) and shaped it into a triangle shape. Use a scissors to cut two straight lines. Watch out not to cut fully or you'll just have minion fingers. The edge would be a little pointy, shape it with your finger by tapping lightly on it. Leave it aside.
 The whole thing should look something like the above. (Hands not attached yet)
 Cut out tiny heart shapes with your blade on blue clay, or you can always shape tiny balls of clay into a triangle shape, then use a metal stick/blade or anything thin and long to push halfway down the bottom of the triangle. Shape the sides, turn it upside down, and you should get a heart. Repeat to make four.

For the fluffy ball on the very top, make a base first. Roll a medium ball and many tiny balls of clay. Stick all the tiny balls of clay onto the medium ball till all is covered as shown above. Stick it on the top of the baby minion's hat.
 
 In the picture on the right, you can see that the baby minion has safety pins on his diapers.
 Roll a very thin long grey clay. Cut into size (one long one short). Bend the long piece to form a U shape. Then use the short piece to connect the bottom of the U. You get sort of an inverted A shape, but rounder.
 Roll out a small ball of maroon red clay and press against the mouth area (it's ok to see a bit of white from the mouth, in fact, i think it'll be nicer) to make the baby minion's pacifier. Then, roll a very long thin maroon red clay and strap around the baby minion as so. Cover up the middle of the pacifier with a short thin piece.

When that is done, roll 2 long pieces of yellow clay for the arms. Attach it to the black part of the hands made previously, then to the body. Careful, it's pretty fragile. You can use glue or a small metal piece to connect the hand to the body.
 The strap goes all the way to the back.
 Baby minion sideways.
 And tadaa! The baby minion should look something like this!
How adorable! I really like how it turned out. What about you?
Probably the eyes could be stuck closer to one another. Other than that, I'm pretty happy.

For more experienced clay molder :
Summarized Baby Minion Tutorial Pics


Check out my other accounts :
Instagram - Craftysupermom
Fb - BoxOfHobbies

You can visit BoxOfHobbies for more updates or customized orders!

Friday, 9 August 2013

Mini Minion Earrings

Crafting is my spirit animal. If that even makes sense.
Anyways, hello again! I have been missing for a while due to the annoying laptop of mine ): It caught a flu. A flu whereby it became a professional wifi detecting device, BUT suddenly could not detect the wifi it has been using it's whole life. I'm not talking about bad wifi connections, but a really odd thing where my laptop can detect everyone else's wifi except my own. It's still sick and I'm currently using daddy's laptop for this post.

For those of you who have been following my Instagram account : CraftySupermom , you would know that I've been following the minion trend!
I mixed several yellow clay with a bit of white to get a nice minion yellow colour.
I was really excited about the idea of having little minion faces on people's ear that I stamped a whole bunch of little circles out.

After doing so, I rolled out thin black straps and tiny eyes for them. I was excited to finish them all that night, but had to go for an event.
 
Sadly, after the event, my fire on making little minions died down. So I only continued finishing them up days after. Whoops.
It kept lying there on the table for days till I finally decided that it's taking up space and annoying me sitting there. So yeah, I decided to finish them up! Woohoo! They are now glossed and ready to be sold real soon!

They'll be up on BoxOfHobbies in a while! (:
If they don't, blame the evil internet :P haha!
Well, that is all! Don't forget to follow me on the right side of this page and on Instagram " Craftysupermom

Tata!