Tuesday, 23 April 2013

G.I.Joe Movie Premiere + Davy Liu

A little piece of memory fetched from March!
Worked part time for GI JOE Movie Premiere on the 26th March 2013! (:
It was pretty fun. Reminds me of when I worked for Jayesslee's concert
Anyways, we got to watch the movie for free! Well, it isn't really my cup of tea, but still.. FREE MOVIE. Haha. My cup of tea is pretty much more like this :
CARTOONS!!!! Wooooo!!!
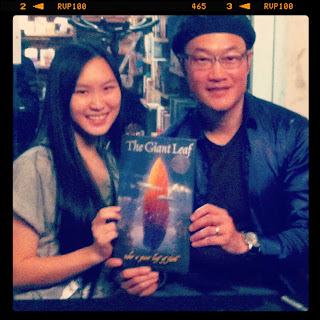
Speaking of cartoons, a legendary Disney animator landed in my church one weekend! He was one of the many who were part of the making of THE LION KING!
He showed us bits and pieces of unfinished work from the project - The Lion King.
 His name is Davy Liu.
He was also part of many other Disney films such as Beauty & The Beast, Bambi, Mulan, Aladdin, The Rescuers & more! Davy Liu has now started his own unique media company known as Kendu which came from the word "Can Do".
Davy Liu came up with many inspiring animated stories like The Giant Leaf (Shown in one of the pictures above), Fire Fish (also shown above), and many more!

I personally loved the story of The Giant Leaf and am very excited for the film to be out in the future! Well, that's all for this post. Thanks for dropping by. I love cartoons. kthxbai.

Monday, 22 April 2013

Blood Donation 2013

 Hi everyone!
How much do you love your blood? I love mine so much that I just had to share it with others!
It's just like when I did here. The blood donation drive was held in my church (City Harvest KL) by Community Care.

I haven't donated for a while now, and was once again excited for it. I couldn't remember how it felt like the first time, whether it was painful or not. So, honestly, I was a tinsy winsy afraid. Yet, at the same time, excited. Just like the very first time. I remember I brought my video camera once. (I actually brought it again this time, but never got to use it at all)
 I actually am not very sure how many times I donated for the book record and the sticker records were different. Oh well. I guess I just got to make sure I bring my book every single time in the future.

You can see a few pictures of my previous donation here, with pictures of the procedure and so on, but here's a new picture! I'm pretty glad to be able to take this shot :
 *No. I'm not sick. I just find these things interesting.*
The nurse just started to poke the huge needle in.
 
 and tadaa! Then it's covered. 
 Didn't manage to take a picture of my blood sack this time.
 Well, that's all. It's just a really random and short post.
Tata!

Sunday, 14 April 2013

Shoe Painting; Floral Vines

 Hi everyone!
I've bought new toys recently! Something I wanted for a really long time now.
FABRIC PAINT

and with that, comes a new project :
 My newly hand-painted shoes!
I am so excited to wear them for the first time after being painted!
Here's how the project started...
 My new but not-so-new shoes. I wore them several times when I went to China. Didn't have other shoes to 'waste' then. I didn't bother washing them before applying extra paint on, I was too lazy to do so.
 Fully white plain shoes.
 with the help of some of my new babies (there were more colours like green, etc.), I manage to paint my shoes to my likings. I mixed these 2 colours above to get the result of an orange-pink shade which I absolutely love. I was afraid that I couldn't mix the same colour, but apparantly, everything went pretty well.
 So, I started painting the border lines.
 See those pale beige flower petals? I actually painted them on wrongly. I wanted to leave the sides white, but I was too excited with the new toys and messed it up. It was actually the darker orange-pink shade, but I painted 2 coats of beige & white over them and it looked much better.
 One of the shoes painted in the darker shade.
 and now BOTH !
I was really happy with the progress! Yay!
 *just showing of my toys*
 A pink shade (red + white) was mixed and painted on to match the orange-pink shade painted previously.
I think it looks pretty good. Now, I just got to add the vines and the leaves!
 What is paint without different shades?
 The lefty and the righty of the shoes. I didn't make them 100% alike. If I did so, I'd probably die from trying. Haha! Besides, art should be free flowed. *claps hand*
I mixed blue and yellow to get green. Occasionally adding white or black for the lighter or darker shade. My set of fabric paint has a bottle of green, but it was more of a dirty green colour I didn't really like. So I mixed my own shade instead.
and TADAA! This is how the shoes turned out! Woooo!! So happy to have them!
I'm thinking of painting and selling shoes (for I love them so), but shoe sizes are such a huge headache. 
Should I, or should I not sell painted shoes?

Leave me a comment, or email me at craftySUPERMOM@gmail.com ! (:
Other than that, do also check out my Facebook for more handmade crafts! Many of them are to be for sale, and custom made orders are also accepted. So yeah. Hope to hear from you soon!

Thursday, 4 April 2013

Tutorial : How To Make Sea Glass


 Fake Sea Glass.
They always make really amazing jewellery pieces!
 They can turn them into something more complicated,
 or even something real simple like these earrings.
and yet, they still look absolutely lovely. Don't you agree?
Simple and sweet!

Well, here's a tutorial on how to make sea glass. You kinda need a cement mixer for this though.
I don't have one, so I am just sharing the tutorial from what I know.

What you'll need:
  • glass
  • a hammer
  • gloves and eye protection
  • cement mixer
  • water
  • sand
  • face mask
Step 1 : Collect glass (Preferably thick ones)
Do remember to remove labels and also clean the glass. Labels can be removed with dish soap and warm water or perhaps you can try heating the glue up with a hairdryer and wipe it off with a cloth while warm.
Step 2 : Break the bottle into pieces
Be sure to wear something to protect yourself from shattered glass. Wear a goggles, gloves and shoes. Probably long sleeves would help as well.
Break them in a plastic or metal box to help reduce the amount of shattered glass to fly everywhere. Then pour them into a cement mixer. Do also wear a face mask to prevent breathing in glass dust.

Add in :
  • glass (one or two kilos)
  • water (5 litres)
  • sand (some rough sand to smoothen the glass pieces)
 Leave it for about 1 hour and then rinse some to check it it's smoother. If it is not smooth enough, you can probably leave for about 2 or 3 more hours. For really thick glass, 4 to 5 hours is fine as well, but do check every hour or two.

Take it out, rinse and ta-daaaa! You've got sea glass!
The End! Bye!

p/s: pictures are taken online.