Showing posts with label Tutorial. Show all posts

Tuesday, 19 May 2015

I've Moved to www.craftysupermom.com

MOVED TO CRAFTYSUPERMOM.COM !!!!


Hi everyone!
It's been a while since you see any activity in this site. Reason being is that I have moved over to http://www.craftysupermom.com ! I absolutely love how it turned out and am very happy with the results.

My views here in blogspot has been increasing, and I am very pleased with that! However, I wanted to give you guys more to see and thought it'd be best to have my crafts more organized in a prettier site. More of an eye candy than an eye sore! I also always wanted it to seem more proper with a .com! Thus, I make the decision and moved. I apologize for not announcing it here earlier, it slipped my mind. I thought I had mentioned but I didn't.

Anyways, this blog will remain here, but all new postings will be up on Craftysupermom! Some of my old posts from this site has also moved its way to that new site. I hope to see you guys there!! Leave me some comments too!

Saturday, 26 July 2014

Tutorial : DIY Photobooth Props (with video)


Hi everyone!! Guess what? I'm going to UK! For a WHOLE MONTH!
Better yet, it's PURELY HOLIDAY! 

Anyways, before I go, I'd like to share something crafty with you!
Couple of weeks back (or maybe a month), I was asked to make some photobooth props for a birthday party!

I rarely do paper-related crafts, but I thought why not? Let's whip up a tutorial with that! And so I did. Here's a few of the things I've made, and then you can watch the video to learn how to make your very own!


You can do any designs you want for your photobooth props. It's fairly simple to make. 
What is needed :
1) A printer / printed designs of your liking
2) Wooden sticks/Satay sticks
3) Scissors
4) Hot Glue / Super Glue
5) Glue

And that's it! Watch my tutorial here!

For more crafty journeys, follow :
Instagram @Craftysupermom
Facebook @BoxOfHobbies 
Etsy @BoxOfHobbies
Youtube @BoxOfHobbies


Tuesday, 15 July 2014

Using Watercolour Colour Pencils

Hello! I've started using watercolour colour pencils and this is my second work. I was quite pleased with my first, but am really really happy with my second.
 I tried them first on a few strands of hair. They looked pretty good, so I continued.
I used yellow, orange, light brown and dark brown for each strand but with a different amount of each colour in them which gives them the different dark and light tones. After colouring each strand, I used a brush to lightly paint the water over and blend the colours.
 Felt like I took forever to finish the hair. I did them strand by strand. No cheating!
  Then I used the same method for the roses. Once again, petal by petal. I used white, light pink and a purplish pink.
 Loving the colours! Even the unfinished piece looks good.
 I was quite scared to colour in her lips. I used red, pink, white.
And I finished up with the skin and the eyes and eyebrows.
Beige and brown was used for the skin, it gives off a light yellow when water is added. I darkened the eyes with dark brown, it turned reddish when I added water, so I just redrew it when it dries and left it as it is. I did a light brown for the eyebrows. 

That's all!

For more crafty journeys, follow :
Instagram @Craftysupermom
Facebook @BoxOfHobbies 

Monday, 9 June 2014

Tutorial : Rilakkuma Clay Figurine

Hello!!! Have you seen my latest post of Kiiroitori? If you haven't, do check it out here!
Because Kiiroitori was made, I thought I should make Rilakkuma too! Any fans out there?

What you'll need :
1) Clay (Brown, White, Yellow)
2) Black Acrylic Paint
3) Glue or Bake N Bond

Let's start!
 
 I don't have too many progress photos as the steps are really really easy. I'm sure you're smart enough to figure it out.

Basically, you'll need 2 large brown clay for the head and the body. 4 medium ones for Rilakkuma's ears and feet (the ears are slightly larger) and 2 small brown clay for Rilakkuma's hands!
Once you got that, it's time to make the yellow pieces. Have them be quarter of what your brown clay is. Roll the yellow clay into balls and press them down. All you have to do then is just place them over the brown clay.

For Rilakkuma's arms, roll them both into a teardrop shape and attach. Yeap. It's that simple!
For the white pieces, it's pretty much the same as the ears and feet except they're a more oval shape. With the body slightly longer than the one on the face.

And now it's time to paint on Rilakkuma's face!
Get out your black acrylic paint! I used a headpin to assist me in the painting stage. But you can use anything with a tip like a needle or a toothpick. Make sure your hands are still. You can also practice on a piece of paper first if you're unsure.
 And tadaaa! You're done!
For more crafty journeys, follow :
Instagram @Craftysupermom
Facebook @BoxOfHobbies 


Sunday, 8 June 2014

Tutorial : Kiiroitori Clay Figurine! (Rilakkuma And Friends)

 Hey everyone!! It's Kiiroitori from Rilakkuma And Friends!!
I personally am not a fan of Rilakkuma or Kiiroitori, but I thought it's a really really cute little fella. So I thought to just make one out and see. Here's a tutorial so you can do the same!

What you'll need :
1) Clay (Yellow, Orange, Black)
2) Toothpick/Clay tool
3) Glue/Bake N Bond (optional)

 This character is very very simple. Roll a yellow ball of clay. Start by making Kiiroitori's beak. Roll 2 very small pieces of orange clay. One slightly bigger than the other. Place it on with glue/bake and bond just like the photo above. Then use a toothpick or your clay tool to press two dots on it's upper beak.
 Make the 2 little dots of Kiiroitori's eyes. Then, make some thin long black clay strands and cut them into several pieces of the same length. Use this to make the feet and the hair on Kiiroitori's head. Press the strands one on top of the other to keep them together before gluing them down.
 Roll out 2 pieces of yellow clay each into a teardrop shape for Kiiroitori's wings! Glue them together if the size is right!
 And with that, you're done!

Also check out our Rilakkuma!

For more crafty journeys, follow :
Instagram @Craftysupermom
Facebook @BoxOfHobbies

Also, I now have my very own Etsy!!
So do drop by to visit!

Thursday, 22 May 2014

Doodled Wedding Keychain

Last year, I was invited to a wedding. As usual, the crafty me thought of making something special.
I wanted to make a upturned glass display piece but it was not very practical. Further more, they'll be moving away after some time and it'll probably be a bit troublesome to bring along.
 A couple of days passed and I noticed this on the groom-to-be's instagram. It was a drawing the bride-to-be did long back. I thought it was pretty cute and decided to make two keychains with the exact same drawing for the both of them.
 And so I got to work!
 This is the outcome. It's slightly different from each other as its handmade, though still very much similar.

From left to right. From paper, to ...uh.. plastic?

Well, that's all for now!

For more craftyness,
Instagram : Craftysupermom
Facebook : BoxOfHobbies

Wednesday, 21 May 2014

Nutella Mickey Bread

Random Mickey Breakfast Sandwich Day!
SUPER simple and yet fun to play eat.
 I'm sure you don't need any instructions for this... but, since I'm already here..
YOU HAVE NO CHOICE

Step 1 : Get a cookie cutter and cut out the middle of a slice of bread
Step 2 : Spread nutella throughout the 2nd slice of bread
Step 3 : Place bread no.1 on bread no.2
Step 4 : Enjoy your masterpiece
Step 5 : Eat with JOY!

THE END!
Wooo!! You actually made it till the end!
Congrats!
Bye now! Have a superbly awesome day!

Monday, 5 May 2014

Tutorial : Clay Baby Sven (Frozen)

Hi everyone!! I've posted this completed photo of Sven from Frozen I made with clay on my instagram some time back, but only had the chance to post its tutorial now. So here goes :

What you'll need :
1) Clay (Brown, White/Beige, Dark Brown, Black-optional)
2) Clay tools if available
3) Scissors (small ones if available)
4) Wires
5) Glue / Bake N Bond
 Using the brown clay, pinch out an appropriate amount of clay for Sven's head, body (with legs) and hands. To make the body, roll out a cylinder shape and cut the bottom into half. Then, gently use your fingers to smoothen it out to form rounder legs. Use a toothpick or your clay tools to draw a line at the top of the legs then push the cylinder body down on the table top and gently use your hands to help push the legs up as shown in the photo.

Make Sven's hands the same length as the feet or slightly longer. I also made them skinnier than Sven's feet.
 Now, to make the head. Roll a ball shape and gently use your finger to roll one side till the whole piece has a teardrop shape. Then, Poke two holes on it's head for Sven's antlers later on (it will be attached with a wire so it doesn't fall out easily). I used a ball tip to poke the sides of Sven's head for it's ears. Leave it aside to dry (for air dry clay).
 Next, we're making Sven's hands and feet hoofs. Make 2 larger balls of dark brown and 2 slightly smaller balls of dark brown for this.
 Press them down gently on the table so its flat on both ends. Use your tool/toothpick to press down once side till it's slightly to the middle (as shown in the photo above). Use glue to stick Sven's hoof to his legs. Repeat the same thing for his hands.
 Sven has some white/beige colour around his eyes. I made two flat pieces to stick it on and blended the sides out as much as I could.
 Sven's muzzle is made with dark brown clay (it looks a little maroon-ish though) and a ball tip is used to make his nostril and a sharp clay tool is used to draw a line for his mouth.
 Put them together and it should look like this.
 
 For the ears, take a ball of brown clay shaped into a droplet shape, and a smaller ball of beige clay shaped into a droplet shape as well. Press them flat together and use a clay tool to press it from inner ear outwards. Meaning the rounded end to the sharp end.
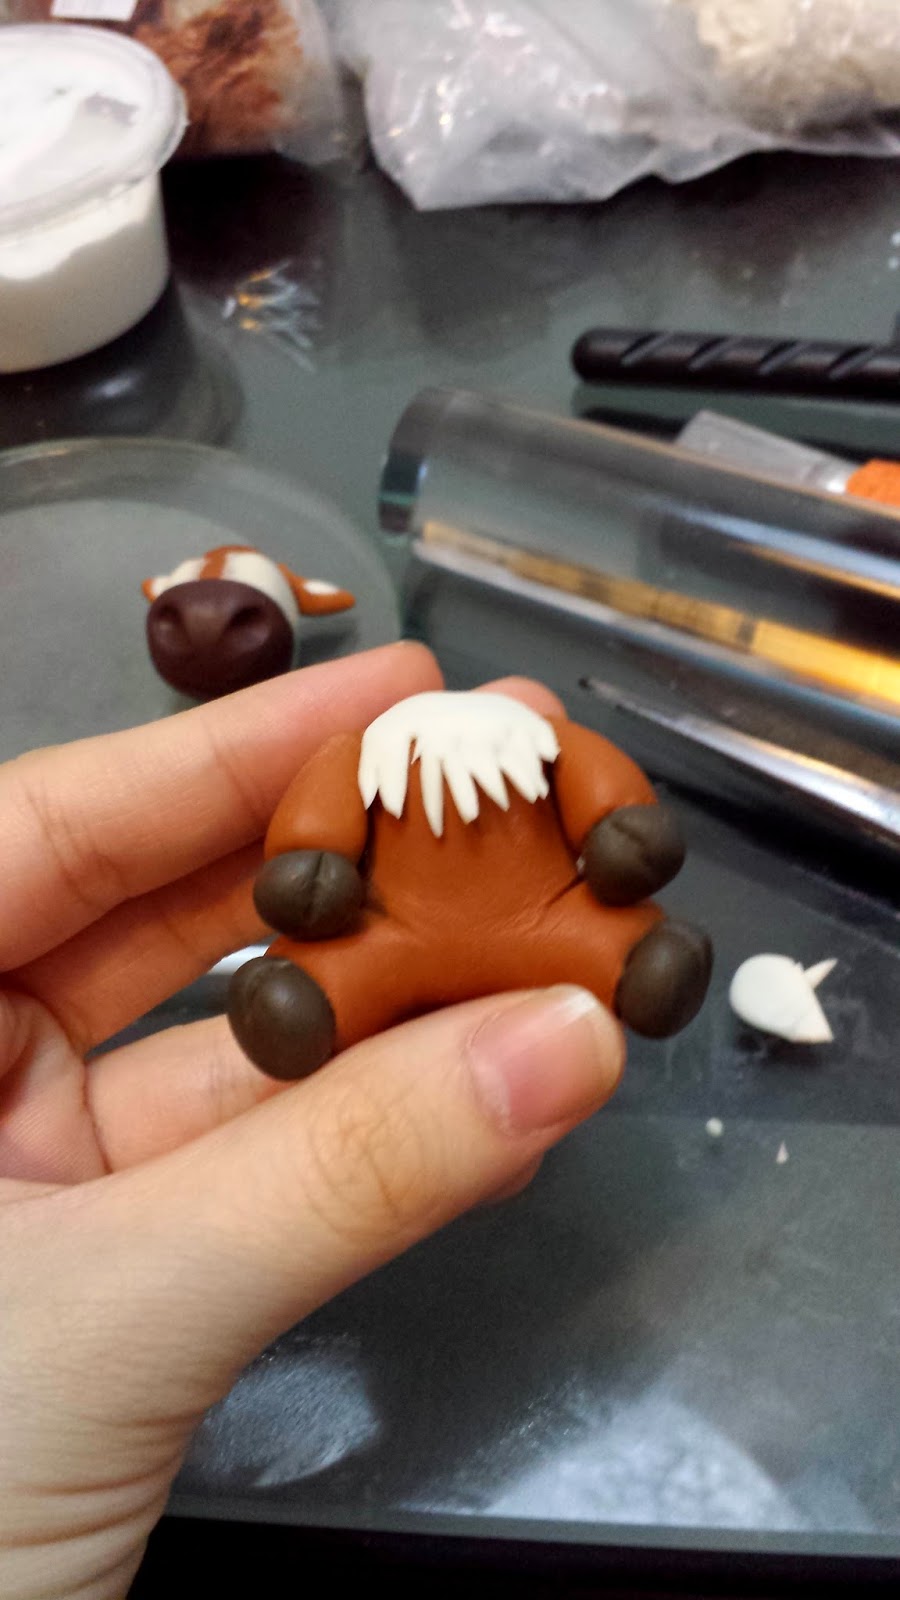
 Sven from Frozen has white 'chest hair'.
So, I rolled out a thin piece of clay about x2 size of it's neck. I shaped the back a little rounder for the 'fluff' effect? and used a scissors to cut up strips in front. I did a second layer the exact same method. I poked a hole with my wire for attaching the head later on.
 I added 2 tiny brown clay for Sven's eyes then added the eye whites.
 Let's give Sven a little tail. Again, you can use scissors or a needle to make the tail ends.
 Make the antlers by rolling white/beige clay around a wire for the main piece, then add a small piece to the side blending it together. Leave a tinsy bit of wire at the ends and poke it down the head. Use glue to secure it better.
 I then painted the white part black. You can use black clay for this as well. I initially did a small black dot where you can see the whites still, but Sven from Frozen looked a little scary with that. So I painted it full black in the end.

The End!
Hope you enjoyed my tutorial on making Baby Sven from Frozen with clay!

For more crafty journeys,
Instagram @Craftysupermom
Facebook BoxOfHobbies