Showing posts with label Children. Show all posts

Tuesday, 19 May 2015

I've Moved to www.craftysupermom.com

MOVED TO CRAFTYSUPERMOM.COM !!!!


Hi everyone!
It's been a while since you see any activity in this site. Reason being is that I have moved over to http://www.craftysupermom.com ! I absolutely love how it turned out and am very happy with the results.

My views here in blogspot has been increasing, and I am very pleased with that! However, I wanted to give you guys more to see and thought it'd be best to have my crafts more organized in a prettier site. More of an eye candy than an eye sore! I also always wanted it to seem more proper with a .com! Thus, I make the decision and moved. I apologize for not announcing it here earlier, it slipped my mind. I thought I had mentioned but I didn't.

Anyways, this blog will remain here, but all new postings will be up on Craftysupermom! Some of my old posts from this site has also moved its way to that new site. I hope to see you guys there!! Leave me some comments too!

Saturday, 28 December 2013

Children's Holiday Program 2013

Hello everyone! It's the children's holiday!
There was an event called 'Project Independence' by Sunnyside Daycare.
I was asked to help out for this event and I really enjoyed myself! I believe the kids really enjoyed themselves too! They got to play & learn so much!

One of our game session :


We learned to make simple food art with a sea themed!
The children loved it! They were so proud of their artwork.

 Focusing on where to put his fish.

Their hard work :
 This photo's upside down. Couldn't get it to rotate.


Other than the food art, I got to teach them to sew as well!
Surprisingly, the boys loved it so much! Now who says boys can't sew?
Check out Wesley with his handmade pencil case (unfinished) and Chen Han in the making of his!


 We also had a pizza making session! The children got to cut their own ingredients (with supervision) and design their own pizza!

We gave them all a t-shirt with some templates and they got to design it themselves. They were also allowed do it without a template if they want.


 Wearing their awesomely decorated shirt with their handmade pencil cases!

 They are all really creative. Give them a box of hama beads and they'll be making all sorts of stuff! Here are a few keychains in the making.
They really enjoyed themselves and it's great to see how they love what they have learn. They also took the initiative to ask when they are unsure. Proud of them!

Well, that's all for this post.
Thanks for dropping by

Face/Body Painting

Hello! I recently participated in an event doing face/body painting..
so just thought of sharing a few things I've painted then..

 Cow

 Panda

and my favourite of the day :
 I drew the outline of the bird, coloured it in, then added the fluffy blue green colour on the outside as the sky.

 Clouds were added too! Happy little boy.
 
Batman

I also did a few Spiderman face paint, MU devil and Liverpool logo.
Unfortunately, I didn't have time to take a photo of them. Oh well. Shall do those again in the near future.

That's all for this post!
Tata!

Friday, 28 June 2013

'The Sanhedrin' ; The Making Of The Shield

A few behind the scene photos presenting the making of the shield from 'The Sanhedrin' by CHCKL.
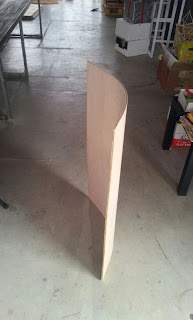
In our previous production "Chromeheart", the shields were made flat. But this time round, we decided we want our shields curved.
And so, we starting figuring how we can bend the wood.
Our handsome props team trying out all the methods that they could think of.
We finally manage to find a successful way after many failures. The bending of the wood takes a lot of time. And we could not make a bunch of them in one go as we lack certain resources.
When that was done, the handles for the shields were fixed up with nails.
The shields were then painted, buffed and we did a final touch up.

These are how they looked during production :

That's all for today. Tata.

Friday, 7 June 2013

Tutorial : Jet Packs For Children

Jet Packs! Woohoo!! So sorry for the blur photo above, but yeah, that's how the jet packs will be. It's real simple to make and a whole lot of fun!

What you need :
1) A pair of 1.5 litre bottles (same shape preferred)
2) Grey spray paint (or any colour you want your jet pack to be)
3) Coloured paper for fire (Red & Orange?)
4) Hot glue gun/Tacky Glue
5) Square Cardboard Pieces
6) Strings/Ribbons
7) Scissors
8) Double sided tape (strong)
9) Patience & Love
So we started of spray painting all the bottles. Yep. We made a lot of jet packs. It was for an event.
They'll look like this. Try to even out the paint by spraying further away from the bottles, but with several layers.

Cut out a square piece of cardboard to fit both the bottle's middle section in. Notice that the board at the back doesn't peep out too much on the sides?

Before sticking them down, poke four holes on each corner. Loop a ribbon on the right side, and another on the left. This acts as the loop to slip the child's arm in. Side can be further adjusted later on.
Next, cut out a large piece of fire and a small piece of fire. Both of different colours as shown on the picture.
You can try making the fire in different colours with different texture. This on has a glossy effect.
You can also make them in un-matching colours.

Here's the bunch of jet packs we made..

Pretty neat eh? Here's one of my favourite picture of the jet packs :

All of them stacked up together in my craft room! Aww. Imagine the kids zooming around the room or garden. How adorable.

Well, that's all for today! Hope you enjoyed reading! (: