Friday, 9 November 2012

My Chinese Wedding

 Hey everyone! Wonder why I'm so dressed up? Well, the title says it all. I just had my Chinese wedding. And when I said that, I really meant my Chinese wedding.
 Oh look! There's a ring on my finger!
 Hahaha! Alright, so the story begins like this.. 
Once upon a time, a boy met a girl, and they fell in love. 

kidding!

This was done for one of my college assignments under "HHS4M Individuals and Families in a Diverse Society" in CIMP. 
 
 This here's the guy whom I got 'part-time' married to. We 'divorced' again after that. *wink*
 Those who made our wedding a success.
And here's our little 
We hope you enjoy watching the video as much as we had fun making it!
My first photo with my first pay cheque !
Tadaaaa! Bye!

Tuesday, 6 November 2012

Tutorial : DIY Turquoise Display Stage

 Hey everyone! How are you guys? Recently, I just joined a young entrepreneur's competition. It's held at Kid's Marketplace, Sri Hartamas Shopping Centre. Yes, kid. I'm still a kid at heart. *grins widely*
The age limit was 18, so I thought I should join for the experience and also, you get a free booth to sell stuff! What a great opportunity! 

Well, my booth had something special with it. A handmade turquoise stand. Here's a short tutorial for you :
Two cardboard pieces. What can I do with them?
Take a can of turquoise (or any colour you like) spray, and turn the cardboard pieces into pretty cardboard pieces!

Spray them all and fold them accordingly. (Mine was actually pre-folded)
Glue them into this shape with a hot glue gun by just connecting the ends.
Then glue the two shapes together to make this awesome turquoise stand which can now use at booths! Don't forget to put something hard, or stuff the spaces in between the cardboards with some newspaper! Else, it'd be a little flimsy.
 Practice set-up at home.
 
Tadaa! This was in Sri Hartamas the past Sunday! <3
The whole event went well and I earned quite a bit. I also met a fashion blogger who loves my items and decided to do a review on them! I'm so excited! Thank You Lord, for the opportunity.
I got a certificate after the event stating that I participated in "Kids Market Place" etc. Oh well, stay young while you can! Alright. That's all for now. Thanks for dropping by. Tata!

Friday, 2 November 2012

CREW T-Shirt !

Hey everyone!! I brought my awkward baby to college today!
Today's post is about a project I just finished.
 Black clay t-shirts.
 Sliced with a handmade templete.
 Hand drawn/painted with black acrylic paint on a needle tool.
 The order was made for the crew of an event. Thus, the drawings are all different as to show the task the specific crew did.
 The drawings are then coloured with Sharpie markers.
 
 All of them are coloured nicely.
 The plain black t-shirts need something more.
 The word 'CREW' was added on all the black t-shirts.
 Red, Blue, Green and Yellow acrylic paints were used on the t-shirt.
These are the products look. They are attached to a pin later on. I currently do not have a picture for that. So sorry. That is all for now. Goodnights!

Thursday, 1 November 2012

Tutorial : Egyptian Headpiece

 Hi everyone! I have a really interesting post today! (Or at least, I find it interesting myself)
I'm going to post a tutorial on how to make an Egyptian headpiece! I made it for my college's Halloween dance party. 
I only got to make the headpiece on the day itself after classes which was about 2:30pm. I went to the hardware store to get gold spray paint first, then head home to start making.

Let the tutorial begin!
What is needed :
1. Gold chain (can obtain from old necklaces)
2. Nice looking pieces of old jewelry/special ribbons
3. Beads
4. Headpins and jump-rings
5. Pliers
6. Gold Glitter 
7. A heart full of love and patience
 I started out by taking off the hot air balloon from my necklace. Then, I hooped the chain around my head to measure the size. (The top right of the picture shows my head size). I held it in place and cut them with pliers. Use the existing chain hoop or a jump-ring to connect the two wanted ends back.
 After measuring and cutting, get the extra chain and connect them to the middle of the headpiece. This is for the dangling beads in front.
 I placed each bead on a headpin and used a round-nose pliers for the top.
 The first big bead connected with the extra chains.
 The remaining beads added with only the headpin and jump-rings.
When this is done, it's time to add strands of gold on the side of the Egyptian headpiece.
 
 Hunt around the house for a few of things that may seem suitable for the sides. I found these silver things at home and decided to use them. (I always keep rubbish so that one day they may have the opportunity to turn into treasures)
 I lay down recycled papers outside and the 'special ribbons' on them. Because they're silver, I bought Anchor's gold spray paint to cover the silver. It was not shiny enough, so I took gold glitter and sprinkle all over.The shinier you want your Egyptian headpiece to be, the more glitter you add.
 
 It was raining then and I had no choice but to do it then cause the party's that night itself. So, I used an umbrella to block the rain. After applying glitter, I sprayed a few layers of gloss to keep the glitter on the strands.
 
 The lovely golden strands.
 
 Check out how I hung my necklace as to add the gold strands and to make sure they are about equal on both sides. Slowly add the gold strands to the Egyptian headpiece with a jump-ring. If your strand does not have a loop, you can try using hot glue gun to attach the jump-rings to the strands first.
And with that, the Egyptian headpiece is done! 
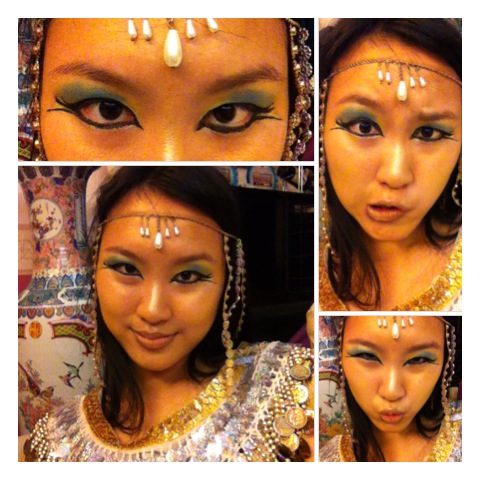
Here's what it looks like with my makeup on.

 I did the makeup myself too! It's only my second time doing make up after helping Shaujin last time. 
I'm so happy with the result. I made my face 'gold' as well by smudging yellow eyeshadow around. I'll share with you about the makeup another time.
 Sometimes girls just want to be girls! Especially when they're all dressed up!
I love my Egyptian headpiece! That's all for this post. I hope you enjoyed reading it as much as I enjoyed making it and writing this post! Bye!